
XMG Apex 15 (B450) Laptop: CPU OC & Undervolting
[Original source] Based on script of my YouTube video: https://www.youtube.com/watch?v=FtLzR-i8XmA
This guide is made for the the following laptops.
[Laptop] XMG Apex 15 with B450 Chipset
[Barebone] Clevo NH50AF1 / NH55AF1 / NH57AF1 / NH58AF1
[Similar laptops] One K56-AR, Eluktronics Thicc-15, Eurocom Nightsky ARX15
[CPU] Zen2 Ryzen CPUs like the Ryzen 5 4600, Ryzen 7 3700X, Ryzen 9 3900, Ryzen 9 3900X and Ryzen 9 3950X
[Note] This guide is made for Zen2 Ryzen CPUs in the B450 based XMG APEX (E20) or B550 based XMG APEX Max (E22) laptop. If you own the newer B550 chipset based laptop XMG APEX Max (E22) together with a Zen3 CPU, then this guide is not applicable for you.
Introduction
Let’s talk about CPU overclocking and undervolting then. And this topic is huge. Let’s dive into it.
You may ask yourself why you should touch the CPU’s settings in a notebook with a fairly low thermal headroom? Well, I personally don’t like components running hot, too, so don’t worry. I will not extend the Apex 15’s performance by increasing heat and decreasing it’s lifetime. I aim for lowering the temperatures and fan noise while keeping the performance. Or may I even increase the performance a little and still keep the temperatures low? Let’s see.
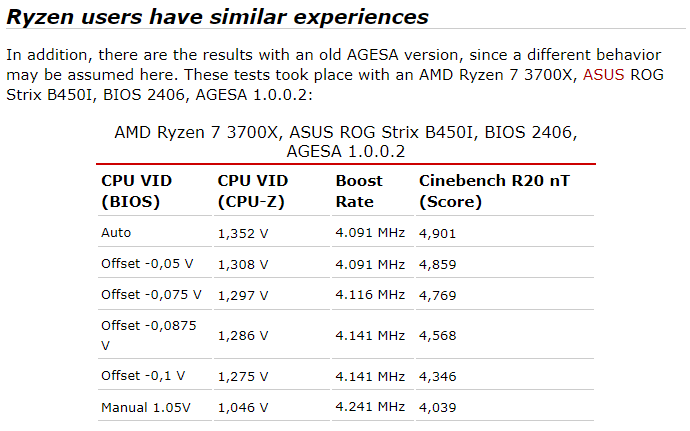
There is no voltage offset setting for the XMG Apex 15, but to be honest, it’s not worth it anyway. Multiple reviews talking about simple voltage offsets with Zen 2 (Ryzen 3000) showed that it may look good at first glance, but can actually decrease the performance by a lot.
Use Manual OC instead
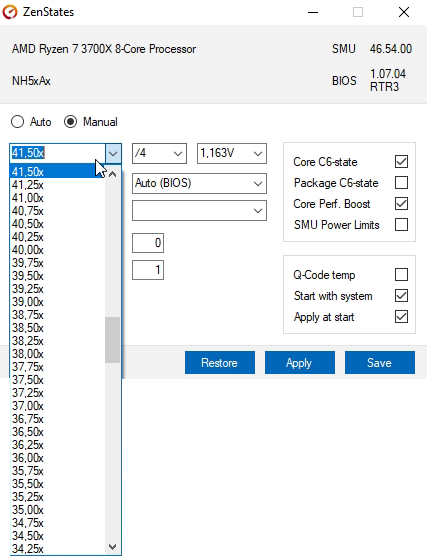
Our only other option is Manual OC as found in Ryzen Master. It allows to set the core frequency (clockspeed) to a fixed value for all cores.
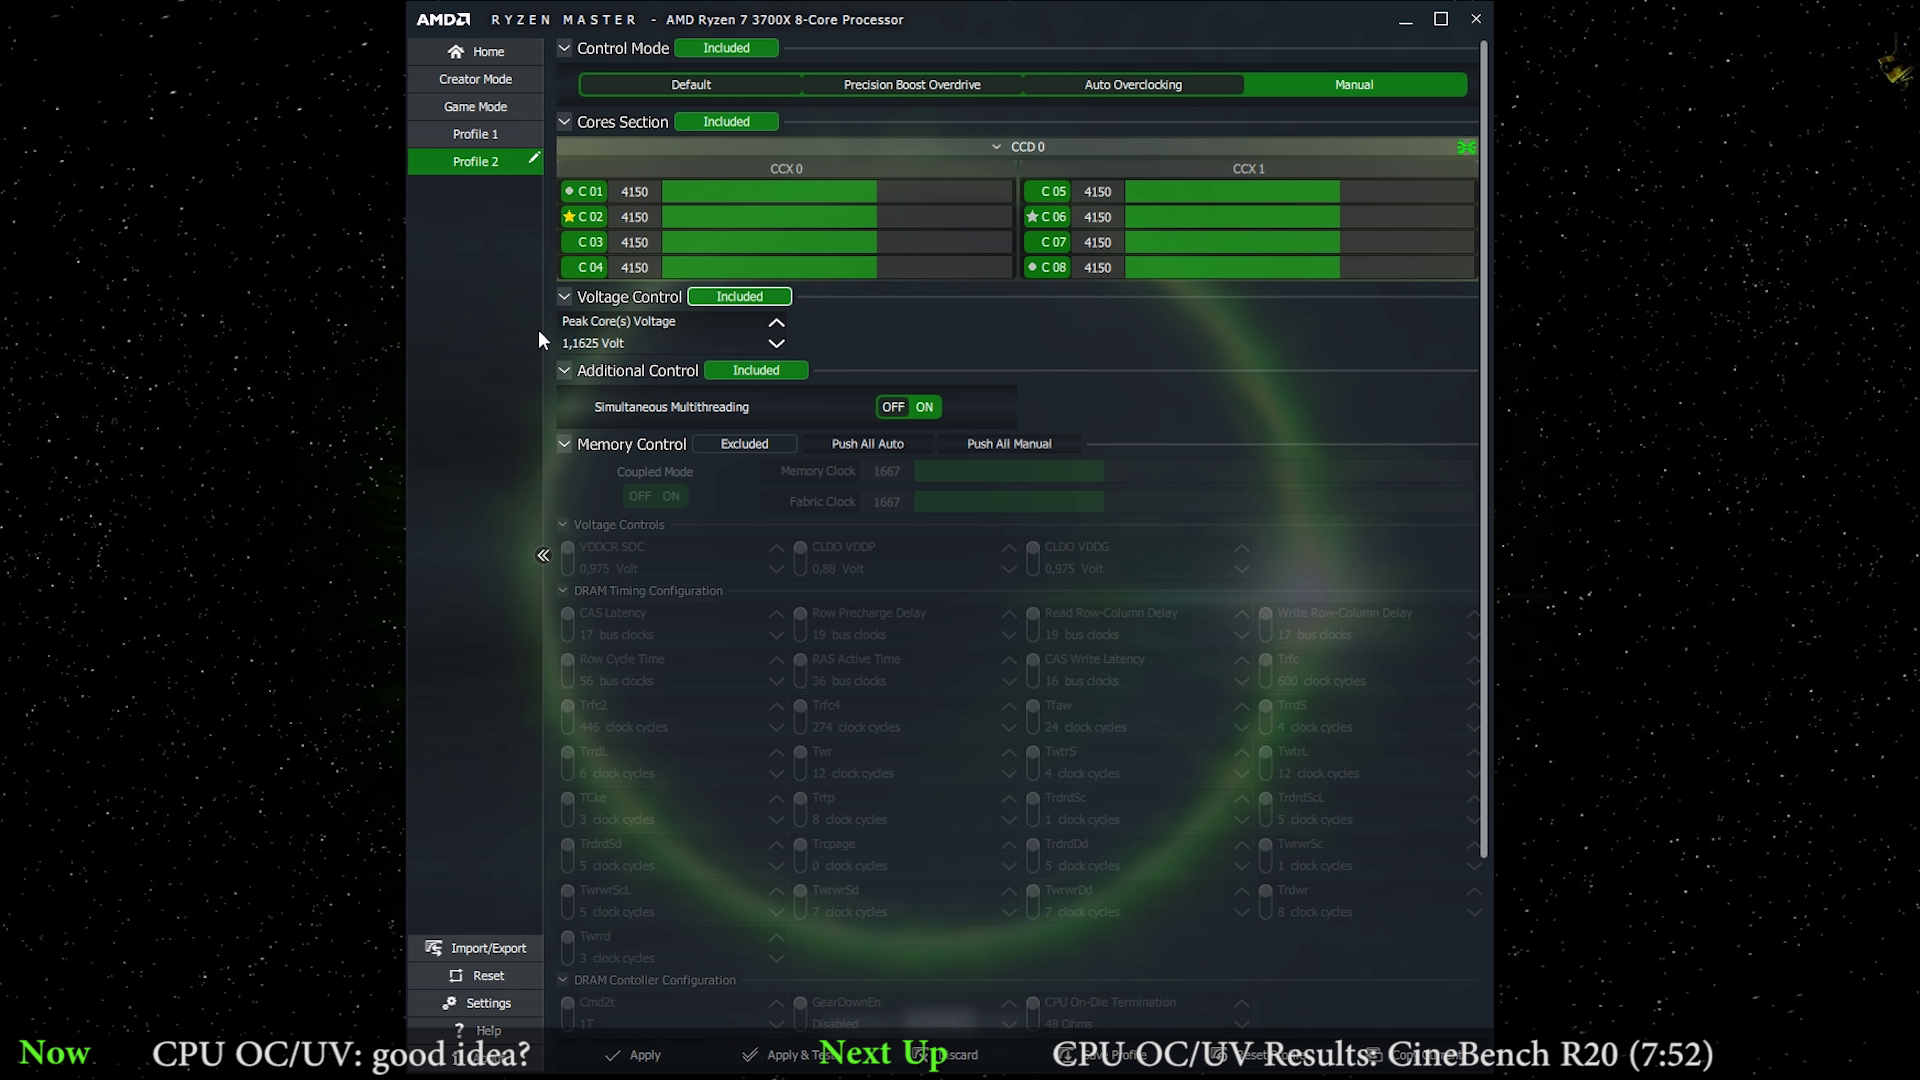
In short, I tried to set my Ryzen 7 3700X to an All-Core “overclock” of 4.15GHz. … To maintain a low power consumption I chose a quite low core voltage of 1.165V, resulting in 82W power draw in CineBench R20 (CB r20), which is roughly the same as in the 88W “performance” power mode when using the Control Center software.
My second setting I tried were all core at 4GHz and 1.075V resulting in a CB r20 power draw of only 65W. Which is on the same level as the “entertainment” power mode.
| Frequency | Voltage | CB20 Power Draw | CB20 Multi Score |
|---|---|---|---|
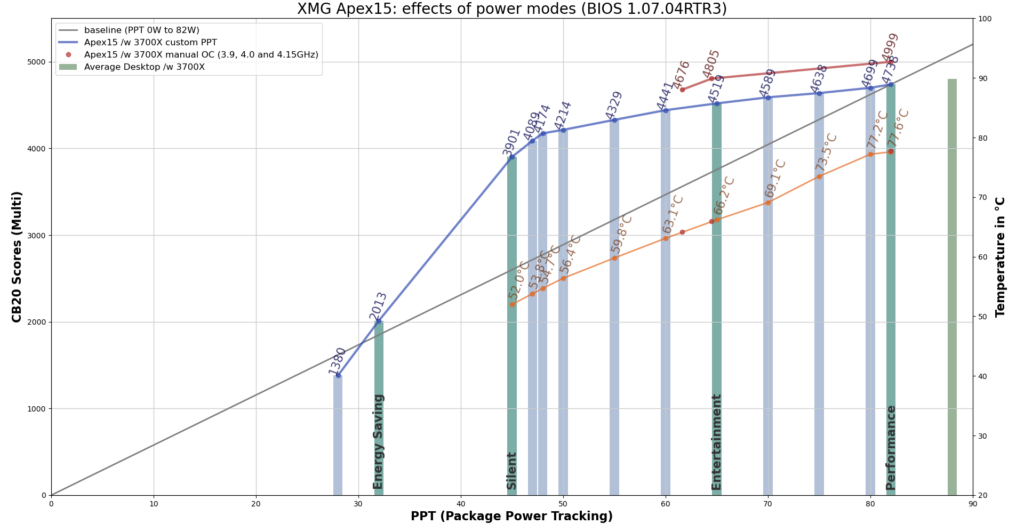
| 4.15 GHz | 1.163V | ~ 82W | ~ 5000 |
| 4.00 GHz | 1.075V | ~ 65W | ~ 4800 |
| 3.90 GHz | 1.044V | ~ 61W | ~ 4670 |
Your results and stability may vary, because silicon lottery always plays a strong role here. Performance-wise those fixed all-core clockspeeds are very beneficial for our CB r20 score. We can increase overall Multi-Core performance to around 5000 points using 4.15GHz and to very respectable 4800 points at 4.0GHz. Both settings draw less power than their powermode counterparts, but offer significantly higher performance in multi-core applications.
The downside of running your CPU at a fixed frequency is of course, that your CPU will not go to the advertised single core boost frequency anymore. But to be honest, single core loads are very rare in reality. Even if you loose your precious CineBench R20 single core score, there should be no noticable downside in real world applications like games and especially not in rendering.
Another promising tuning option can be to tune the processor’s CCX modules individually. That makes sense especially for higher CCX count CPUs like the Ryzen 9 3900 and Ryzen 9 3950X. My 3700X got only two CCX modules, so the benefit would be lower. Fell free to experiment with that option and you are welcome to report your observations.
With which settings to start?
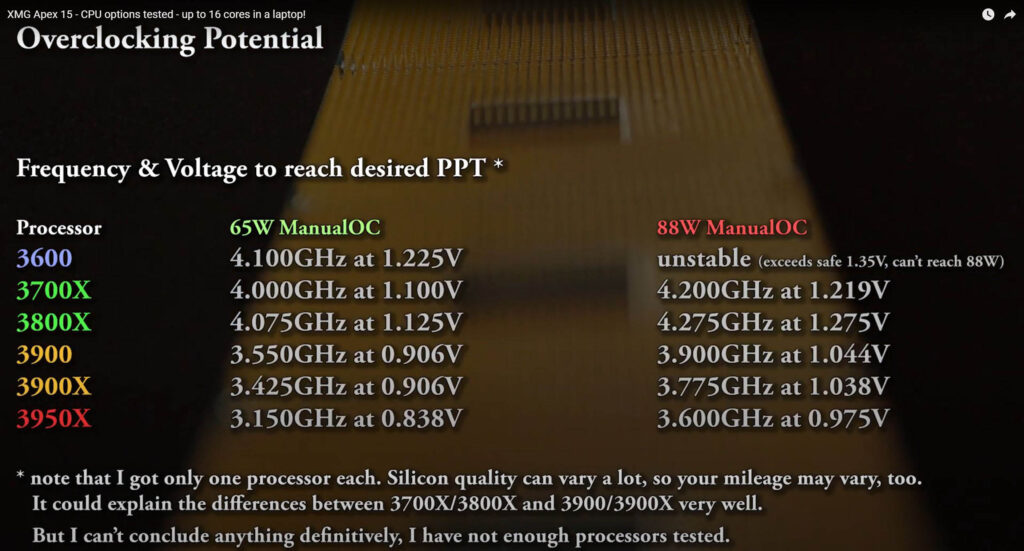
In the following table you can find good starting clockspeeds and voltages for some of the available CPU options for the XMG APEX 15 (E20).
Please note that every processor is different, so don’t expect these values to give you the same results, stability, or power draw. This is just a hint so you can find a good start.
| Processor | Safe Starting Voltage | Safe Starting Frequency (all-core) |
|---|---|---|
| Ryzen 5 3600 | 1.275 V | 4.0 GHz |
| Ryzen 7 3700X | 1.150 V | 3.9 GHz |
| Ryzen 9 3900 | 0.950 V | 3.3 GHz |
| Ryzen 9 3950X | 0.900 V | 3.0 GHz |
Finding stable settings
You should start with a low clockspeed and a medium voltage. Either start to tune the voltage down, or the clockspeed up until it crashes. Also always keep an eye on the “Package Power Draw” while applying load (here: Cinebench R20). You should not exceed the maximum recommended power draw for this laptop (up to 88W PPT) and keep the TDC in a safe range (up to 60A). Also the CPU temperature can be a factor. You should not exceed 90°C ideally.
If you prefer lower temperatures you should aim for a little lower PPT values than 88W, e.g. 75W is usually a good settle point. Especially the 1-CCD CPUs like the Ryzen 3600 and 3700X can run noticablly hotter than the 2-CCD counterparts like the Ryzen 3900 and 3950X.
If you want to find the lower voltage limits of your Ryzen 3000 processor I can recommend to use CineBench R20 for testing. If your settings are close to the limit CineBench R20 crashes softly, without issuing a bluescreen in most cases.
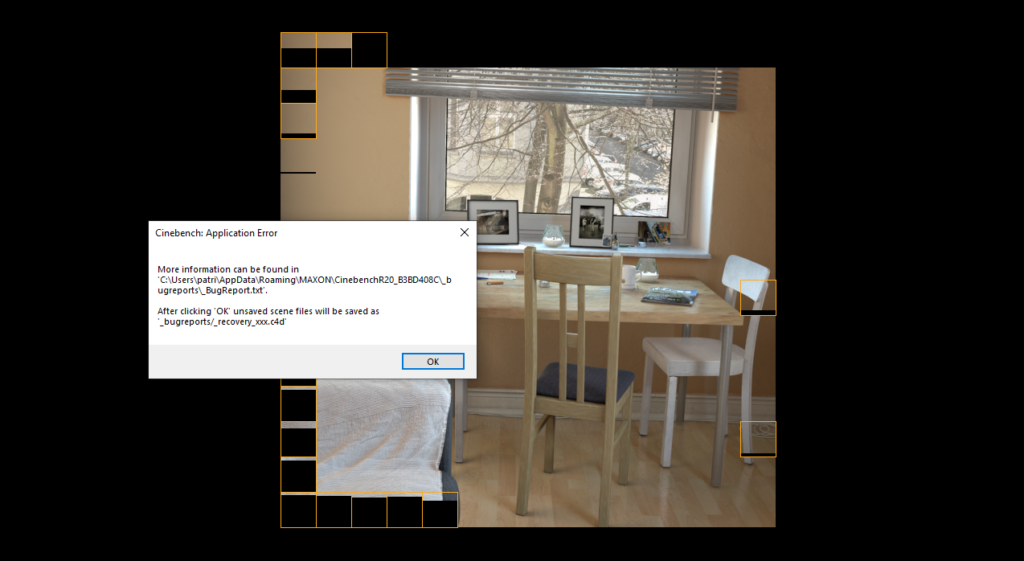
If you experience such a crash dial up your core voltage by 2 or 3 steps, or decrease the core frequency by at least 50MHz. After that you should perform some long-term testing in different applications, before you can call the settings stable.
Automatically apply ManualOC after a Reboot
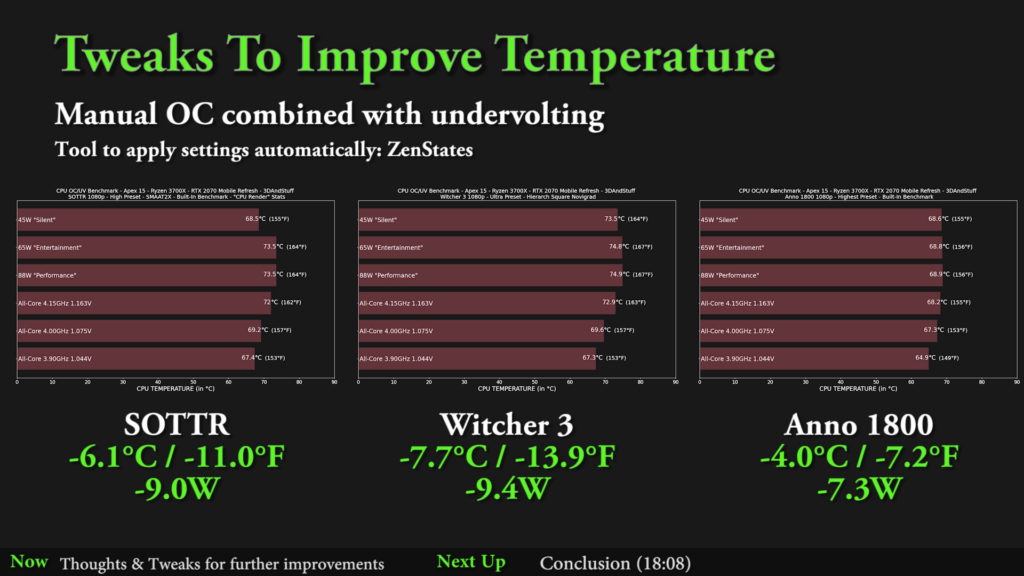
It can be very annoying to use Ryzen Master for daily use, because Ryzen Master will not apply your CPU overclock after a reboot automatically. The tool ZenStates can come in handy here. It offers pretty much the same functionality and also got the ability to apply your settings after startup.
Don’t forget to deactivate the Control Center, otherwise it can take control back and reactivate the PBO power modes in the middle of your work! But don’t worry even after completely deactivating the Control Center application you can still use the individual apps included in it, namely “LED keyboard setting” and “fan speed setting”. Hit your Windows Key and type in their names.
To deactivate the Control Center reliably you need to do two steps. First, Open the Windows Services (Windows Key + type in “services”) and look for “Control Center Hotkey Service”. Right click on it, go to propertis and set it’s startup type to “disabled”. And finally we need to deactivate the “FnKey Application” in Windows’ Autostart. Open the task manager and go to the tab “Startup”, look for “FnKey Application” and deactivate it.
What about the risks?
Normally overclocking is known to potentionally shorten the lifetime of your components, due to higher power draw and temperatures. But that should NOT be the case here, unless you tune your settings to higher than stock levels in respect of the max allowed current (60A TDC).
Using the presented 4.15GHz and 4.0GHz ManualOC the overall voltage and powerdraw in idle and under load is lower than with the regular powermodes.
Battery life can benefit from that a little, too. But don’t expect too much there. We are still under 90 minutes in light load conditions, like webbrowsing, watching videos, and so on. This notebook is not made to run far away from the AC adapter.
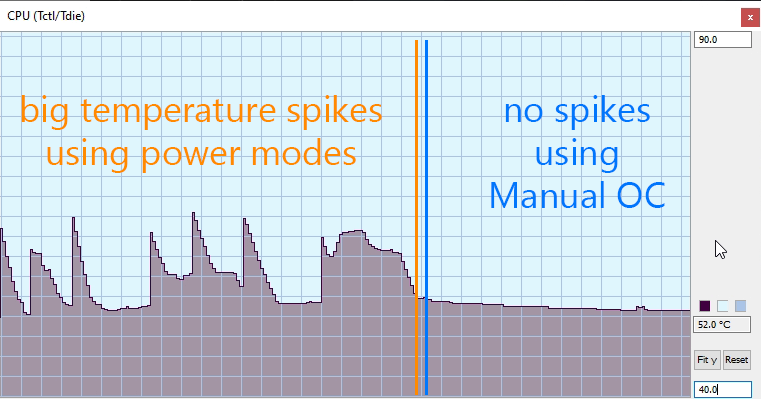
Benefit: Temperature
In the end it turns out that the temperature and fan behaviour is also better using “Manual OC” in Ryzen Master or ZenStates. Remember the strange temperature spikes I addressed in my first video about the Apex15? It is the unfortunate temperature reading “TctlTdie” used by the notebook’s fan controller and let the fans spin up while only webbrowsing sometimes. As shown before it tend’s to be very spikey and shows temperature differences of around 10°C in just a few seconds, while the actual Tdie reading still looks super chilled. But as explained it’s not an Apex15 specific problem, it is commonly known for desktop ryzen systems, too.
Thanks to Taraquin83 by the way. He was the reason I started investigating this behaviour early before even considering to make another video about the Apex 15.
Benefit: Power Draw in games
And finally let’s take a look at the different powerdraws we achieve with our manual overclocking and undervolting versus the regular powermodes, which are using AMD’s PBO.
In SOTTR in 1080p and “High” Preset we see no effect on the average FPS whatsoever, simply because we are GPU bottlenecked. You can easily see that the GPU part pushes less FPS than the CPU could deliver. Compare the FPS-table at the bottom right after different benchmark runs.
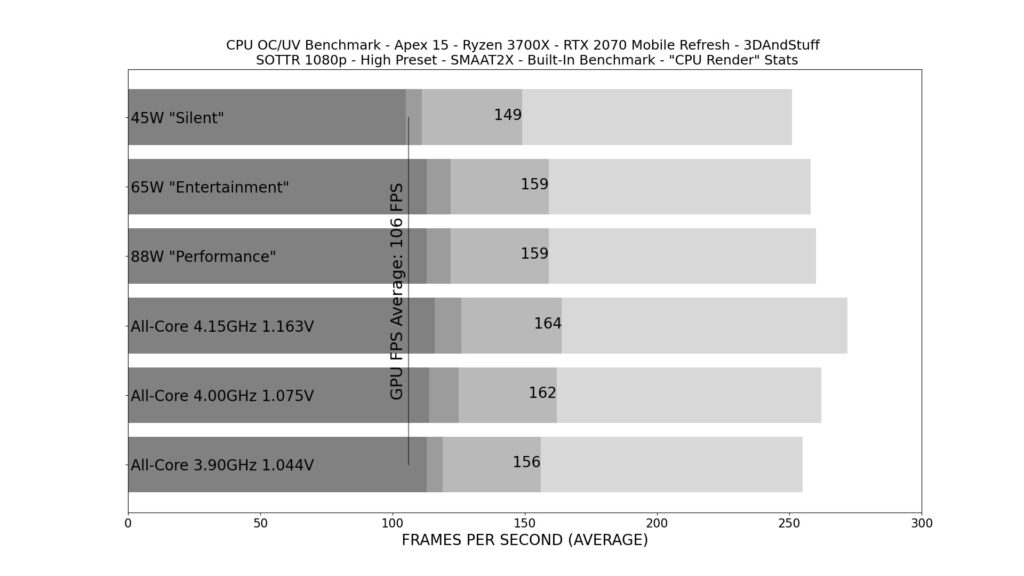
Average FPS according to the SOTTR Benchmark “CPU Render” Stats in the table on the bottom right
Powerdraw on the other hand is noticeable different.
Looking at the highest power mode (“Performance“) we can clearly see that the game in 1080p is never demanding more than 53W of CPU power. That’s also the reason for the very similar results for the 88W performance and 65W entertainment mode. Both power modes will draw the same power, will deliver the same FPS and generate the same amount of heat. Simply because they allow the processor to run fast enough until the RTX 2070 becomes the bottleneck. Only the 45W power mode is not fast enough for more computation heavy scenes, like the one with the village seen in the very end of the SOTTR benchmark.
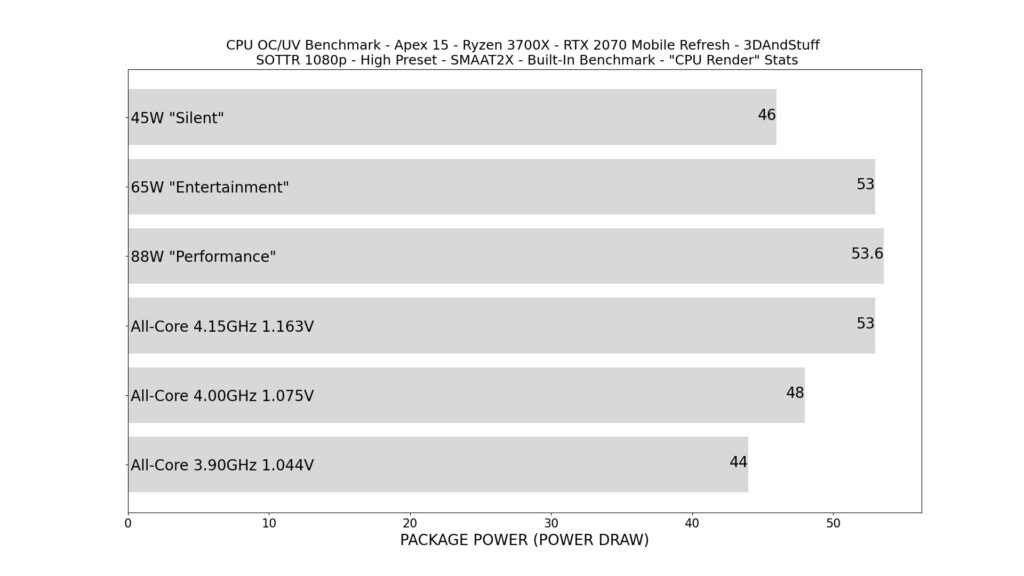
CPU Package Power Draw in Watts
Our Manual OC settings show pretty much the same behaviour, BUT manage to draw less power for the same FPS. And less power always means less heat and less fan noise. Both are highly anticipated in a laptop.
The 4.15GHz with it’s 1.163V core voltage is very close to the 88W performance mode, just as seen in the CB R20 graphs. Finally the 4GHz and the 3.9 GHz Manual OC offer less power draw and therefore generate less heat. Which can also be seen in the lower peak CPU temperatures.
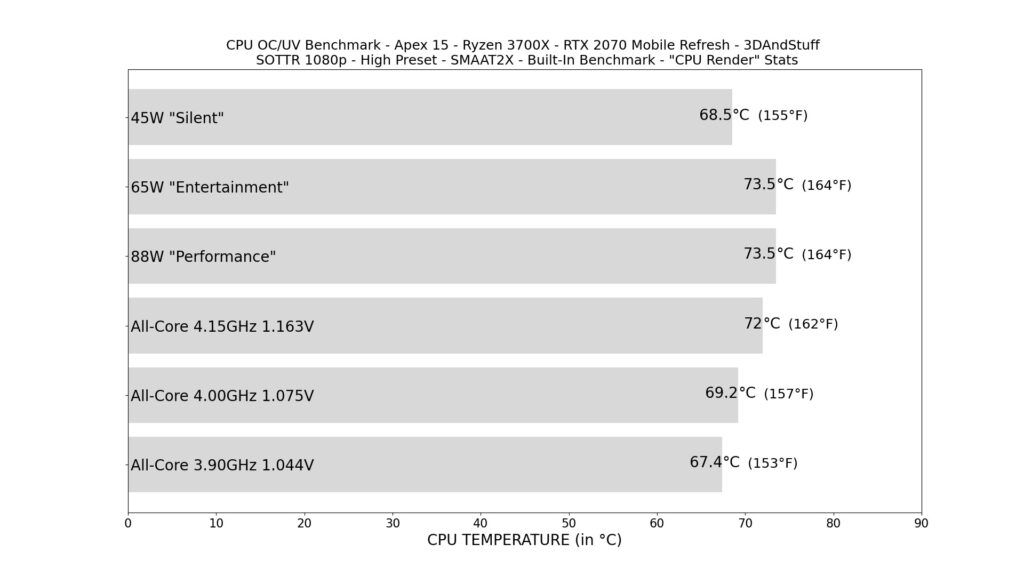
CPU Temperature in °C
Another game I was checking out is Witcher 3 in 1080p and the highest “Ultra” Preset. For the test I used the same savepoint at hierarchy’s square in Novigrad over and over again, because there is no real benchmark available. The story here is very similar to the SOTTR benchmark. The GPU is the limiting factor again, so we see the same 96 FPS in all settings AND the power draw and heat behaves pretty much the same as before. ManualOC results in less powerdraw, heat and noise.

Package Power Draw (W), CPU Temperature (°C) and FPS (minimum, 1% low, average)
Even if we can see that the processor still got some headroom in those benchmark scenes, it does not mean it behaves just like in those two examples in every game. Both used games are not very CPU heavy, but other games could be, and you would be happy to have some extra performance headroom using Manual OC. And because of this, I was looking for another game which we could try out to see the real benefit of Manual OC and undervolting.
A game known to be CPU heavier than other titles is Anno 1800. And in fact it does come with a benchmark! But again, most times the GPU is the limiting factor. Only in the very populated inner city area when you zoom all the way out you can see the CPU bottlenecking.

Package Power Draw (W), CPU Temperature (°C) and FPS (minimum, 1% low, average)
General tips to keep temperature low
And in the end let’s talk about tweaks to improve your experience with your Apex 15.
I found that some users and the reviewer website “notebookcheck” themself experienced some thermal issues with the Apex 15 combined with the Ryzen 3900 CPU. They measured up to 85°C and 60dBa while running Witcher 3 in Ultra settings. I can’t confirm that with my configuration. Unfortunately I only got my own Ryzen 3700X to run all those tests you saw in this video and I never reached those temperatures. But I think the advices shown in this video should help you out, too. Remember, we managed to drop up to 9 watts of power and 8°C without loosing any frames per second.
The benefit could be even higher with the 3900 and 3950X if you do it right. Especially their naturally higher idle power draw (more cores more heat) and nervous fan behaviour can be improved using ManualOC.
Another always adviseable thing to do is to limit your framerate to a reasonable value. Just in case you don’t know what effect unlimited framerates have on your computer: It always try to run as fast as possible and will draw as high as possible power and generate a lot of heat. If you limit your framerate to a reasonable value for your use-case you can keep your components cooler and the notebook quieter.
For example if you are running a 60Hz Monitor you should limit the framerate to 60 FPS, too. Sure you got a 144Hz monitor inside your Apex 15, but you can ask yourself if you really need 144Hz in your game of choice. For a competetive game, yes absolutely, but for anything else it is a “nice to have” feature only. But don’t get me wrong. I totally understand that you want to run your games in 144Hz when you bought a computer with an 144Hz monitor inside.
Conclusion
As a conclusion I would highly recommend to try out Manual OC in combination with a fixed frequency and undervolting yourself. The benefit are lower temperatures and a longer lifetime for the components if done correctly. In some cases you can even gain some minor frames per second, but in most modern titles the GPU will be the bottleneck anyway. So don’t expect too much on the FPS side.
That’s it for this post about tweaking and tuning the XMG Apex 15. Next up will be DRAM memory tuning, which can be super complex. But if you hoped for more FPS in your favorite games, this is the post / video you should watch out for. There is surely a lot to talk about.

I upgraded my CPU on Apex 15 (E20) from 3900x to 3950x, and your article has saved me.
My wife is using the notebook for 3D rendering. I have updated thermal pads, and the temperature is relatively low (about 75C instead 85C with 3900x and stock old paste). But utilization is stuck on 75% and cores run on 2.8Ghz. I used your guide, just, actually, started:
3.6Ghz 0.975V gave me a blue screen,
3.0Ghz 0.9V running perfectly
3.15Ghz 0.9V running in 3Ds MAX on 75C with 95% utilization.
By numbers its a HUGE performance boost 2.8Ghz 75%.
Also, at the single profile the temperature drops to 65% in idle and almost silent coolers. I have never seen this before in this notebook. Thanks!