XMG APEX 15 MAX (2022): Project Hydra & AMD Curve Optimizer
This post is made for the the following laptops.
[Laptop] XMG APEX 15 MAX (2022) with B550 chipset and the Ryzen 9 5950X (16C/32T)
[Barebone] Clevo NH50VR / NH55VR / NH57VR / NH58VR / NH50VPS / NH55VPS / NH57VPS / NH58VPS (B550)
[Similar laptops] None. Up to this day only XMG’s B550 laptop with Zen3 desktop CPUs got the VRM fix and are working with CPUs like the Ryzen 9 5950X properly.
[CPU] Zen3 Ryzen Desktop CPUs
Introduction
Since 6th May 2022 you can purchase the new XMG APEX 15 MAX laptop with Zen3 processors up to the Ryzen 9 5950X, with 16 cores and 32 threads.
And since you got a full fledged desktop CPU inside this beast of a laptop, you might ask if it’s possible to make use of all the tuning and overclocking software available for desktop Ryzen?
Well yes it is and in this post I want to give you an introduction to Project “Hydra” in the Pro and free version by the well-known Overclocker 1usmus, what steps are necessary to make it work for the XMG APEX 15 MAX laptop with the B550 chipset.
On the way I not just gained more performance, but managed to decrease idle power consumption, too. In combination with the EfficiencyMode in BIOS we can change the user experience in a very noticable way. After all the fans became noticable quieter, even if the performance increased.
Let’s get started!
Project Hydra Freeware (version 1.0F)
This guide was originally made for Hydra Pro only, but I decided to include the Project Hydra 1.0F freeware version (aka. 1.0.0.7), too, since its behaviour is somewhat comparable to the newer 1.1G Pro version. You will find all the instructions you need at the end of the Project Hydra Pro sections, but before the Results. Here is a direct Link to the freeware section.
I would suggest you read trough some sections of the Pro version anyway, because you will need most parts of it for the freeware version, too.
My recommended sections to read trough are First Look, Preparations and Diagnostics: Hybrid OC CO.
Project Hydra Pro (version 1.1G)
As I said Project “Hydra” is made by Yuri Bublii, better known as 1usmus, and is made for tuning Zen3 processors. The version I used to make this little guide is 1.1G in the pro version, which came out at the June 6, 2022. The software received a complete code overhaul for the diagnostic tool and Hybrid-OC. We want to make use of both features in this post, so make sure you got the latest version and you are not using an older one (like 1.1F).
Note on the Update 1.1H
The update was announced just in the moment I was about to finish this guide. The newer version includes some fixes and got new useful features (quote from Discord):
- The “Hey, Phoenix, wake up” function allows you to manually continue diagnostics if for some reason it has stopped.
- Improved preservation of diagnostic files.
- The diagnostics settings tab will get the ability to set a starting CO for each core instead of a CO for each CCD.
Pro version you said?
Yes, Hydra comes in a freeware and Patreon-only pro-version. The free version supports Curve Optimizer features too, but does not allow adjustments to the diagnostic settings. Unfortunately I found that some of the diagnostics using the default settings (e.g. 1375mV in the SC diagnostics) are not well-suited for this particular laptop and its VRM characteristics. That’s why I can recommend to get your hands on the Pro version. You can get access to it by becoming a patreon for at least one month for 13€ (probably around 13$). Additionally you gain access to the Project Hydra Discord and can ask question to Yurii (1usmus) and other members of his community.
CO
CO stands for Curve Optimizer and usually referrs to the AMD Curve Optimizer as seen with desktop Zen3 processors. It can be controlled from Ryzen Master and BIOS (a future XMG APEX 15 MAX BIOS could add in the Curve Optimizer option as well). There are also Hydra CO values mentioned in this post. They do the same, but got a little different looks and are limited to the Project Hydra software.
VRM
A VRM is a voltage regulator module and is made to deliver the correct voltage to a chip. There are dedicated VRMs for the CPU, the SoC, the GPU Core, the GPU video memory, the DRAM, and so on.
First look
After opening up Hydra Pro for the first time we see all the important functionalities in the tabs at the bottom. From left to right:
Hybrid-OC is used to apply different “manualOC” (fixed core frequency and voltage) or different “dynamic” profiles together with CO (CurveOptimizer) settings for different load scenarios. For example you can define different settings for single-core or multi-core situations, settings for AVX or FMA3 loads and games.
The Diagnostics tab had a complete overhaul over version 1.1F as I said, so there are a lot of new features included. Before you start the diagnostics you should adjust the settings in the Settings tab. More on that in the next paragraph. When you eventually start the diagnostics process you can choose different tests to be included. Depending on your CPU’s core count and chosen tests this can take very long. More than one hour test duration per core is a usual time window though.
In the AMD PBO2 tab you can define classic PBO2 features as the name suggests, without restarting the laptop. This feature makes it a lot easier to find stable settings, because it allows to adjust the AMD PBO2 CO on the fly iwhtout reboots, thus saving your time. No need to constantly adjust the CO values per core in BIOS over and over again. This tab is perfect in case you want to manually tune the CO values by hand. More on that later.
A new feature since 1.1G is the BCLK adjustment, which was introduced for the 5800X3D, since this processor does not allow any tuning, but only basic BCLK overclocking. If the 5800X3D works in the APEX MAX you might ask? Well yes and no, but more on that in another post at another time. 😉 The BCLK get’s usually unstable at above 102 MHz though, so more than a 2% improvement should not be possible.
The Logging tab is just for analytical output during the tests.
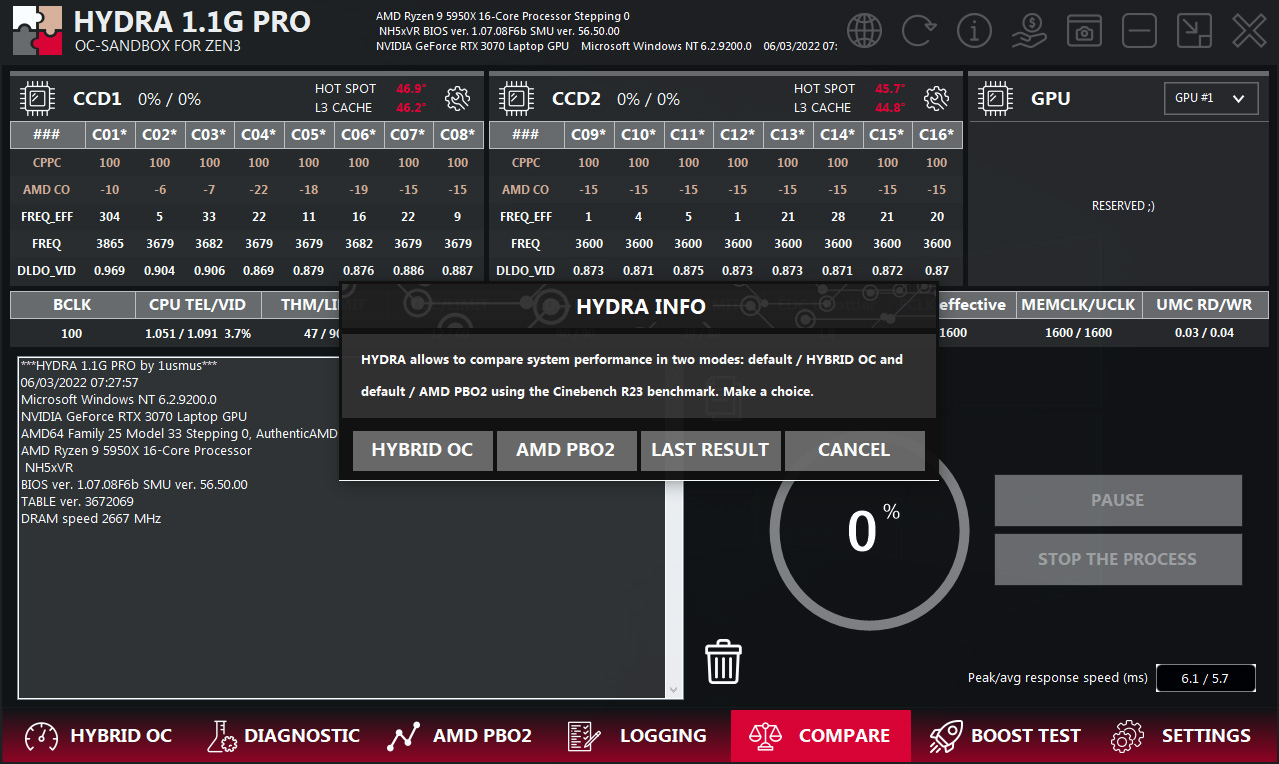
The Compare tab allows to compare your newly found settings against your stock results.
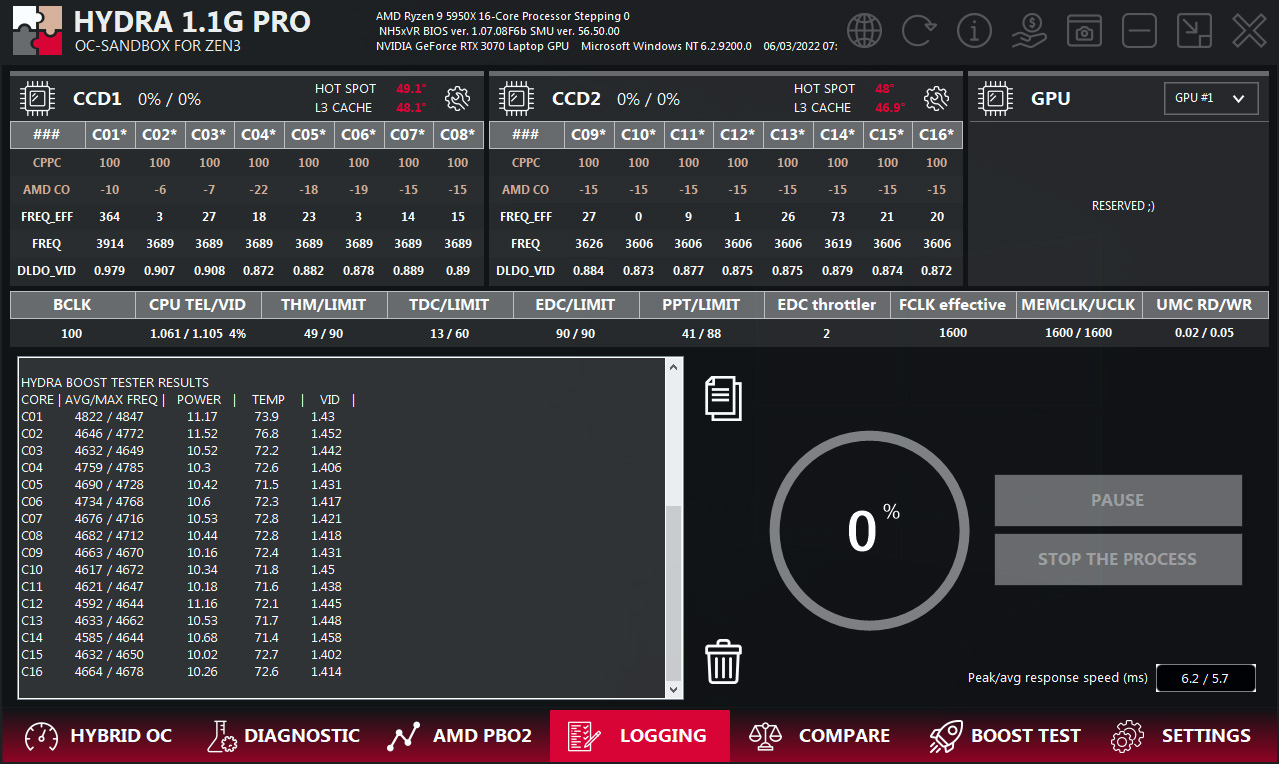
The Boost Test tab allows you to test your individual CPU core’s boosting behaviour. Some cores boost higher out of the box than other’s, even without any CO (curve optimizer) adjustments.
The Settings tab is the one we should take a look intop right from the start. Here you can set all the limitations your computer/laptop should operate in. Limitations are very very important for the constrained VRM (voltage regulator module, the mainboard’s power delivery for a component like the CPU) design in this laptop, which only allows 88W PPT, 60A TDC and 90A EDC by default.


Preparations
1) Control Center
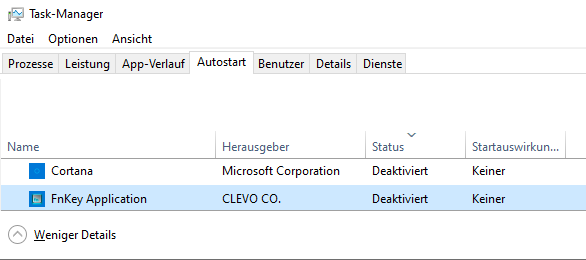
The very first thing to do is to deactivate the Control Center software completely. Why? Well, because the software changes CPU power settings from time to time during runtime, but we want to give Hydra full control over them to make it work properly. To deactivate the Control Center completely you need to do two steps. First, open Windows services and deactivate “Control Center Hotkey Service” or set it to “manual” mode. Second deactivate the “FnKey Application” in Windows’ startup menu (Task Manager >>> Startup tab). Don’t forget to reboot after you have made the changes.

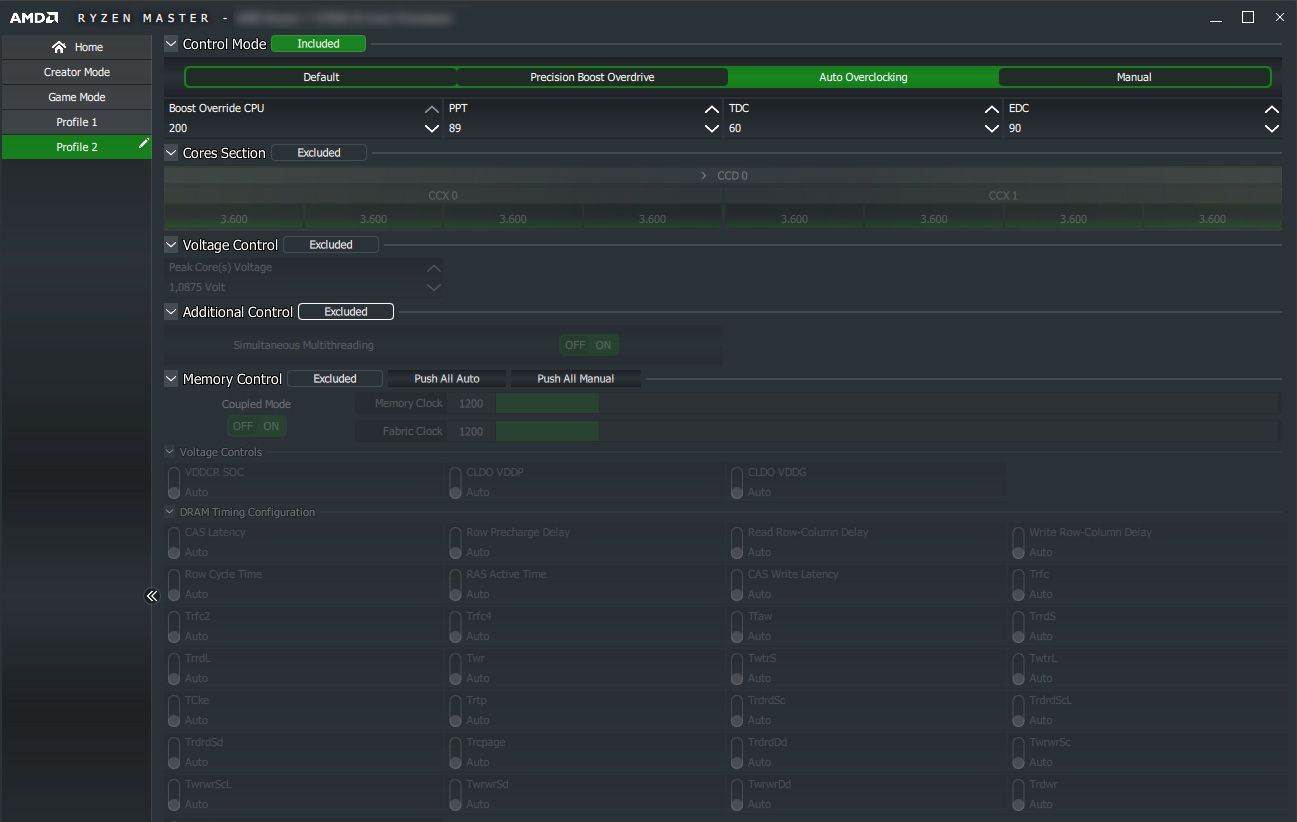
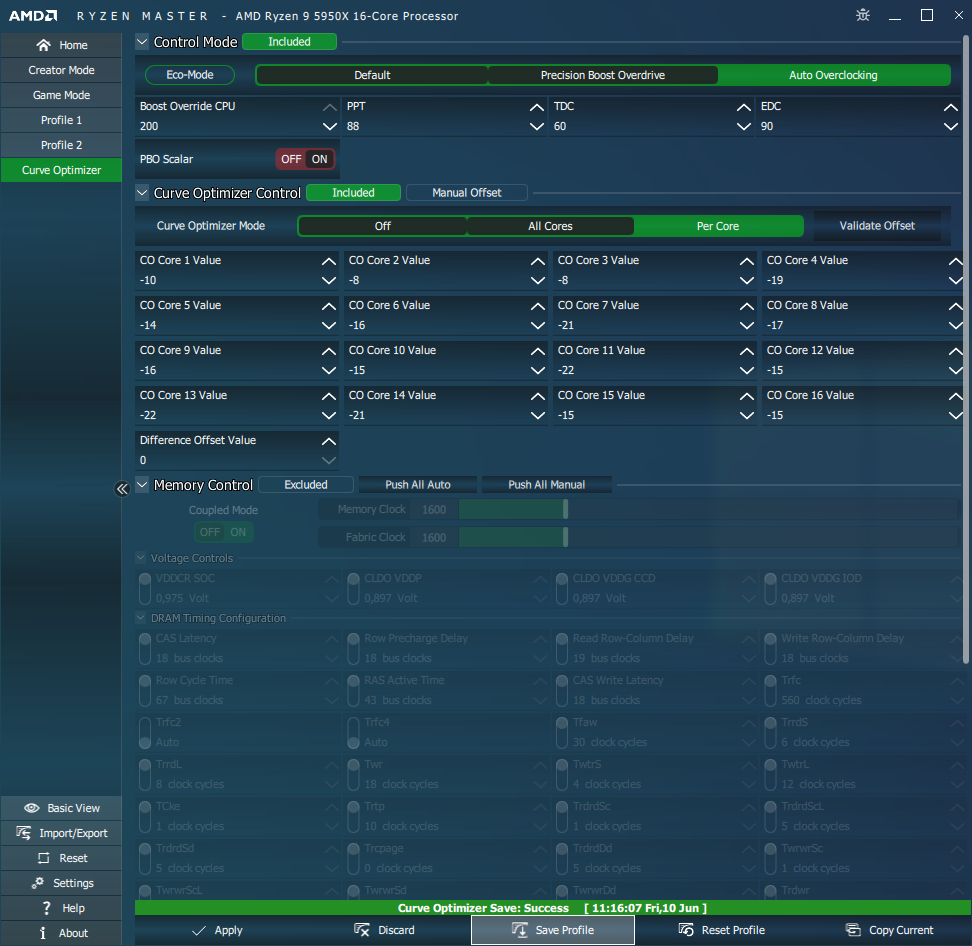
Another basic config which is needed according to Hydra’s manual is to set the Auto-OC “Boost Override CPU” offset of your CPU to +200MHz. This can be done in Ryzen Master, which needs a reboot to apply. Make sure you uncheck (“exclude”) all other unnecessary sections. All other settings should stay on auto according to Hydra’s recommendations.
A future BIOS version might also support this option directly from BIOS, including other PBO2 settings like the AMD Curve Optimizer. Beta tests are running.
After the reboot Ryzen Master will open up automatically. Make sure to close Ryzen Master before you start Hydra. They can’t run at the same time.
2) Safety Settings
Before we can start with any automatism to find CO values or look out for some Hybrid-OC settings, we have to adjust the default system power safety values set by Hydra. They are way too high by default. Mine were at 220W PPT and the TDC and EDC didn’t look healthy for our small VRM design as well.
Usually I would suggest to set it to the values shown in the screenshot below, which is 10% over stock settings (88W PPT, 60A TDC, 90A EDC). This little headroom will make sure the Hydra diagnostics pass without aborting due to exceeding the limits for a brief moment.
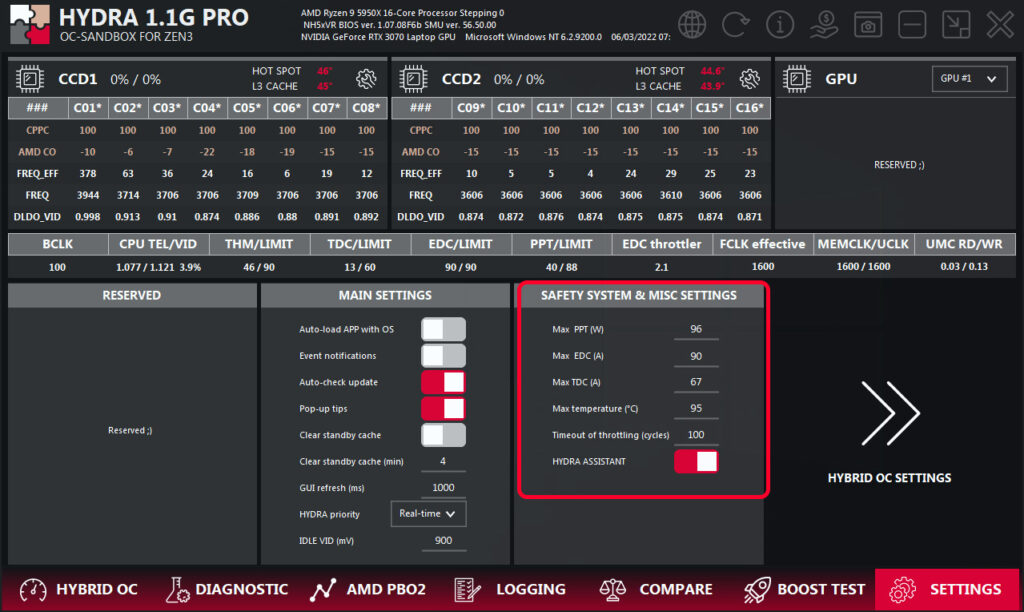
Version 1.1G only:
There possibly is a bug in version 1.1G, with which Hydra does run the diagnostics test with the processor’s default power settings (142W PPT, 95A TDC, 140A EDC), no matter which values you set in the safety or PBO2 settings. This might be a bug, at least some users reported it already and I am curious if it get’s fixed with version 1.1G2. Nevertheless those higher limits are no problem if we choose the single-core tests (SC) only.
So I set them to 142W PPT, 60A TDC and 140A EDC. This is way above stock too, but better than the defaults and is necessary to pass the single-core diagnostics in my experience. Using our laptop’s default settings (88W PPT, 60A TDC, 90A EDC, “ECO-Mode”) led to aborted diagnostics because either the PPT or EDC limit was exceeded for a brief moment (f.e. with the “EDC limit exceeded!” error).
But in all my tests the higher power limits never were a problem for the VRM since we will use the single core test in the diagnostics only.
But DO NOT USE the multi-core tests (MT) until this issue is solved! It shouldn’t be able to break your laptop, because the VRM got some protection mechanisms. But better don’t risk it. 😉
So set them to those unusual values, just for the diagnostics and make sure you do not run ANY other application while the diagnostics are running. It’s wise to set disconnect your WiFi and Ethernet cable, so Windows will not start to do anything in the background. Otherwise all applications together could lead to too much load on the CPU and would trigger the protection features inside the rather small VRM. Of course it’s wise to go back to the stock CPU power settings after Hydra’s diagnostics are done and you’ve found your CPU’s tuning values.
So it’s time for a WARNING: With higher settings than the laptop’s defaults you could experience faster hardware degradation due to higher temperatures on the CPU and VRM side.
Return to the laptop’s default power settings after the diagnostics!
3) Laptop Fan settings
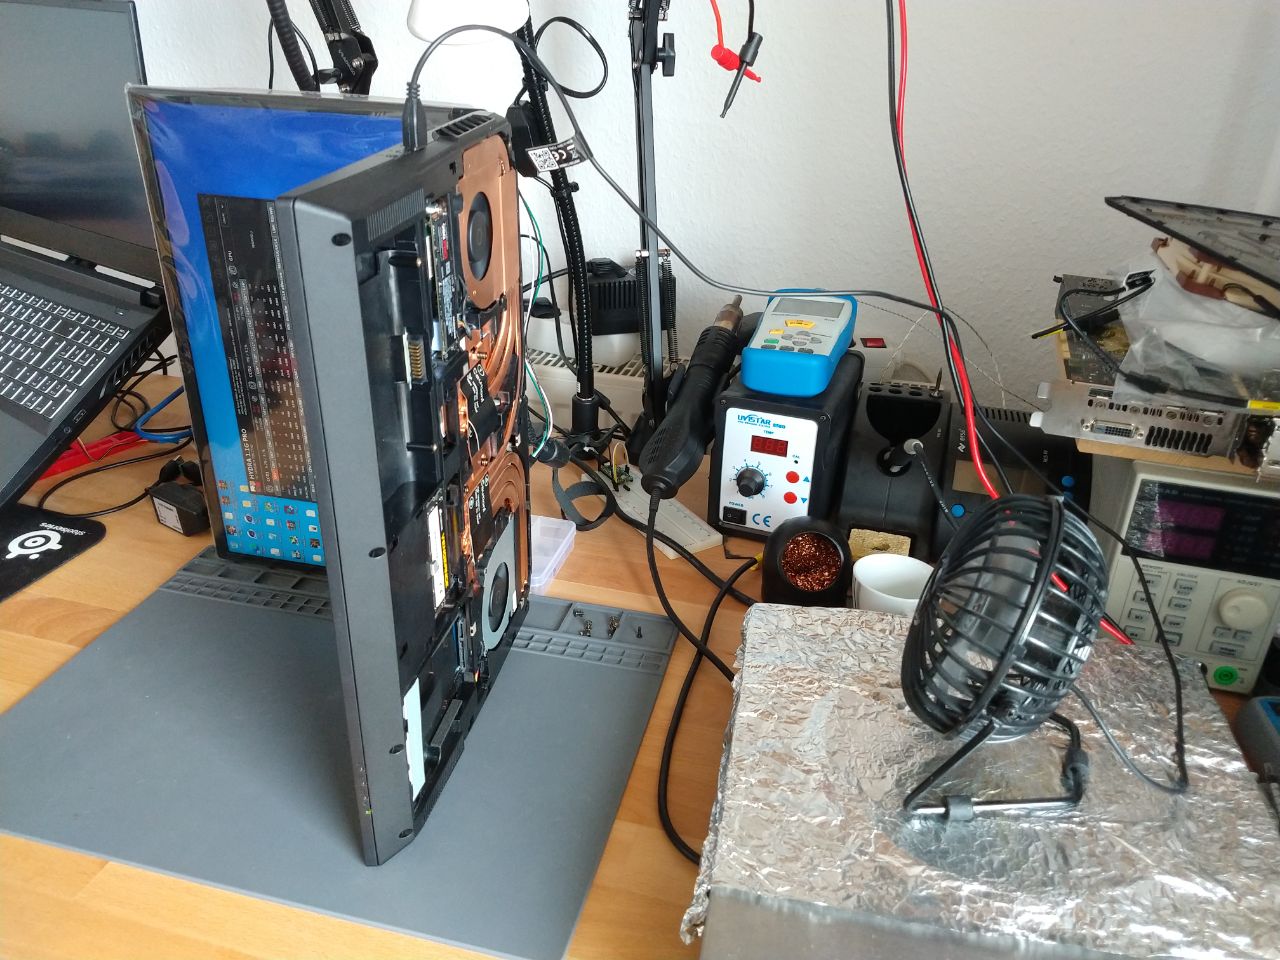
Talking about higher temperatures, you might run into one very annoying problem. The diagnostics tool aborts when the CPU peak temperature exceeds 95°C for a brief moment. Testing in single core mode can drive one core’s temperature to such high numbers only in an environment with hot ambient temperatures, older thermal paste, or heat trapped under your laptop. To prevent any unnecessary high temperatures I would suggest to lift the back of your laptop up a bit using a book, or even better, a ventilated notebook stand. Some more extreme cooling improvements like shown in the following photo could be necessary, too, in case you can’t keep the temperatures down. Put the laptop on its left side, remove the back cover and point a desktop fan on the heatsink. This can drop your CPU temperature by another 5°C (9°F).
Additionally you should set your fans to full speed for the entire diagnostics. Unfortunately the fan boost (Fn + 1) does turn off in case the laptop reboots or crashes. And yes, this will very likely happen. But don’t worry, Hydra is designed to take this into account and crashes are considered normal during diagnostics. Hydra will automatically continue its diagnostics after you are back in windows (sometimes it fails, see FAQ section). So it may be better to use Windows automatic sign-in (no password) for the entire diagnostic duration.
But back to the fans… A better way to keep your fans at maximum is to open the application “fan speed setting” (using Windows Key + typing in the name), which is part of the deactivated Control Center. But don’t worry, it will still work fine without the Control Center running. Now go to the fan offset slider and set it to 100%. This setting will stay, even after a reboot, and will eventually be reset after a completed shutdown only. Perfect for this situation.
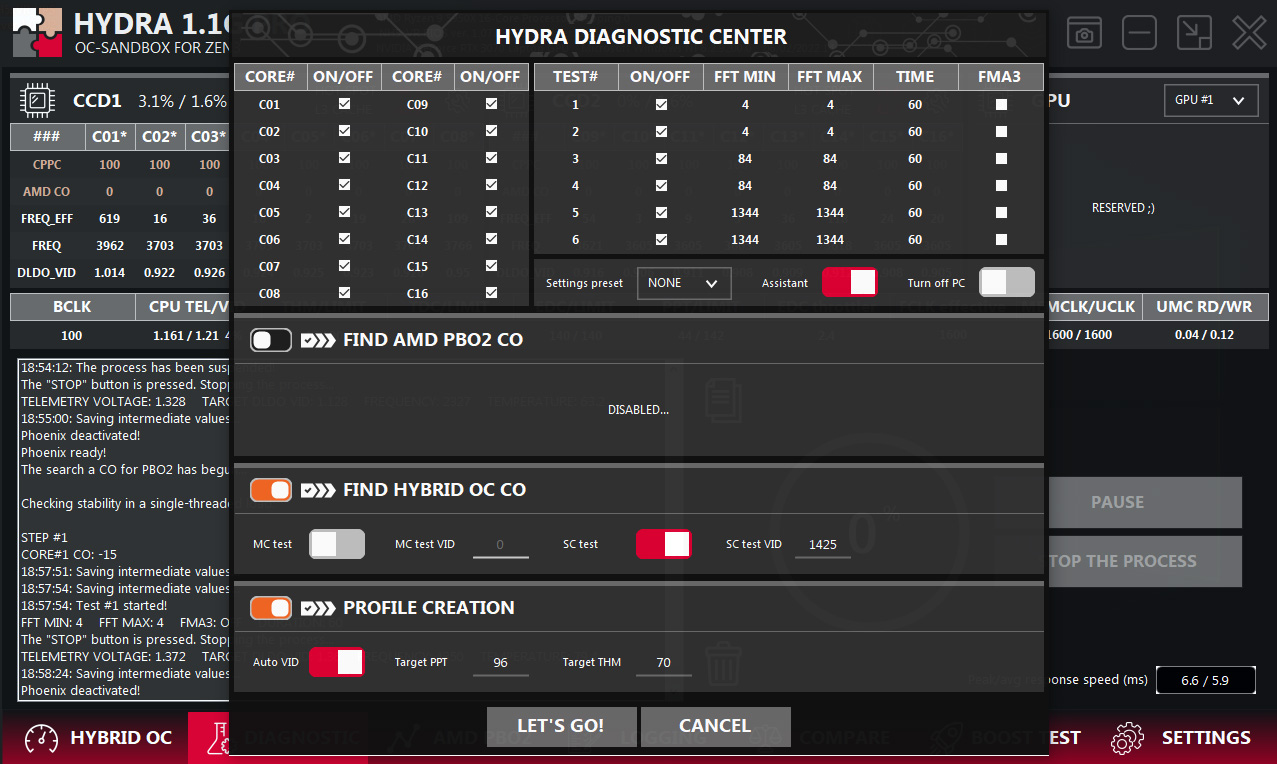
Diagnostics: Hybrid OC CO
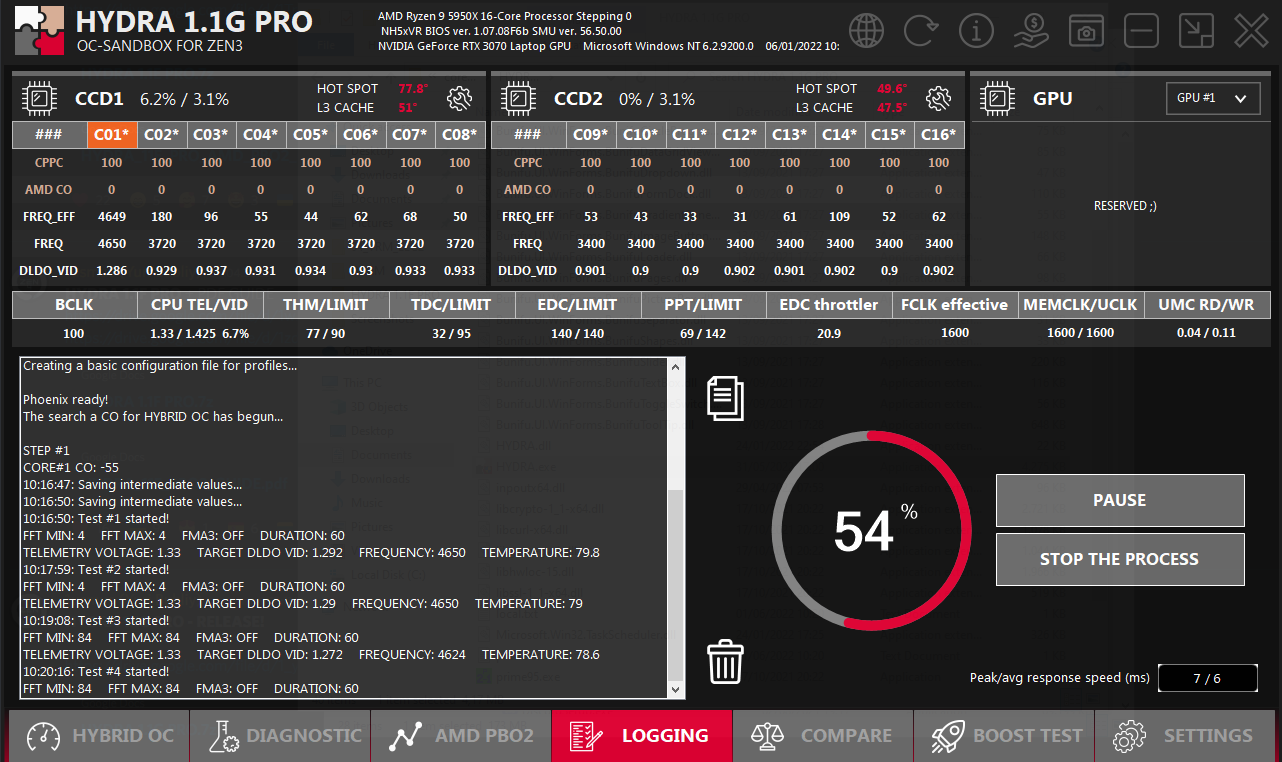
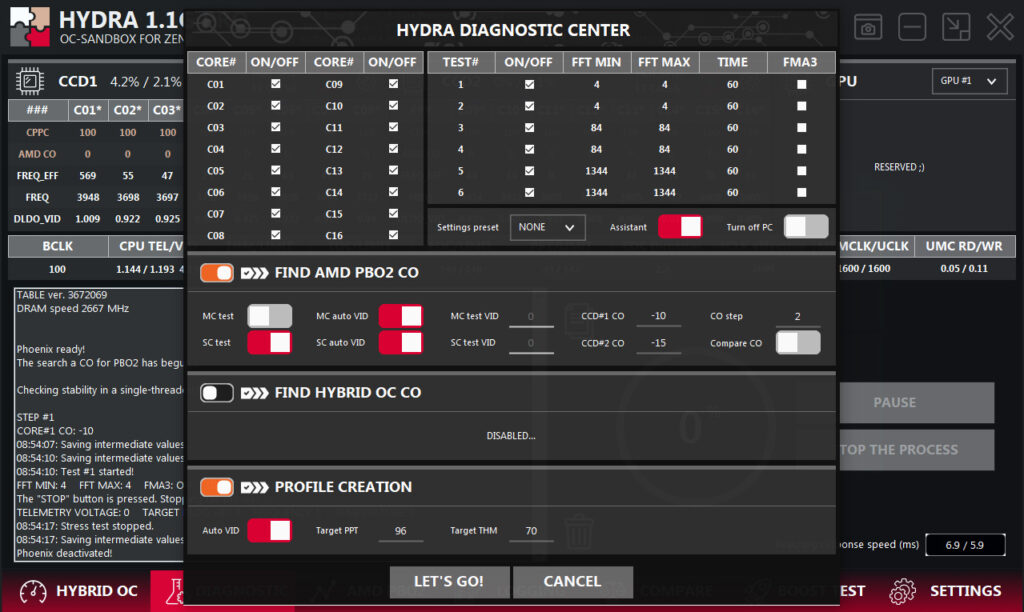
Let’s finally start with the diagnostics tab. The new version 1.1G allows some adjustments before the very long diagnostics process starts.
At first I chose only the Hybrid OC CO test (screenshot). The “Find AMD PBO2 CO” test will be discussed down below. As settings I chose the “normal” test duration of 60 seconds with all Prime95 FFT tests (as set by default). Also deactivate the multi-core (“MT”) test and let Hydra just diagnose the single cores. This is usually good enough to find rough estimates for just-stable-enough CO (curve optimizer) settings. As always it’s a good advice to not run at the very edge of your CPU’s stability in daily situations. Crashes will arise sooner than you think. So of course I will also tell you something about the safety margins you should consider according to my experience with the Hydra tool. But as always: your mileage may vary.
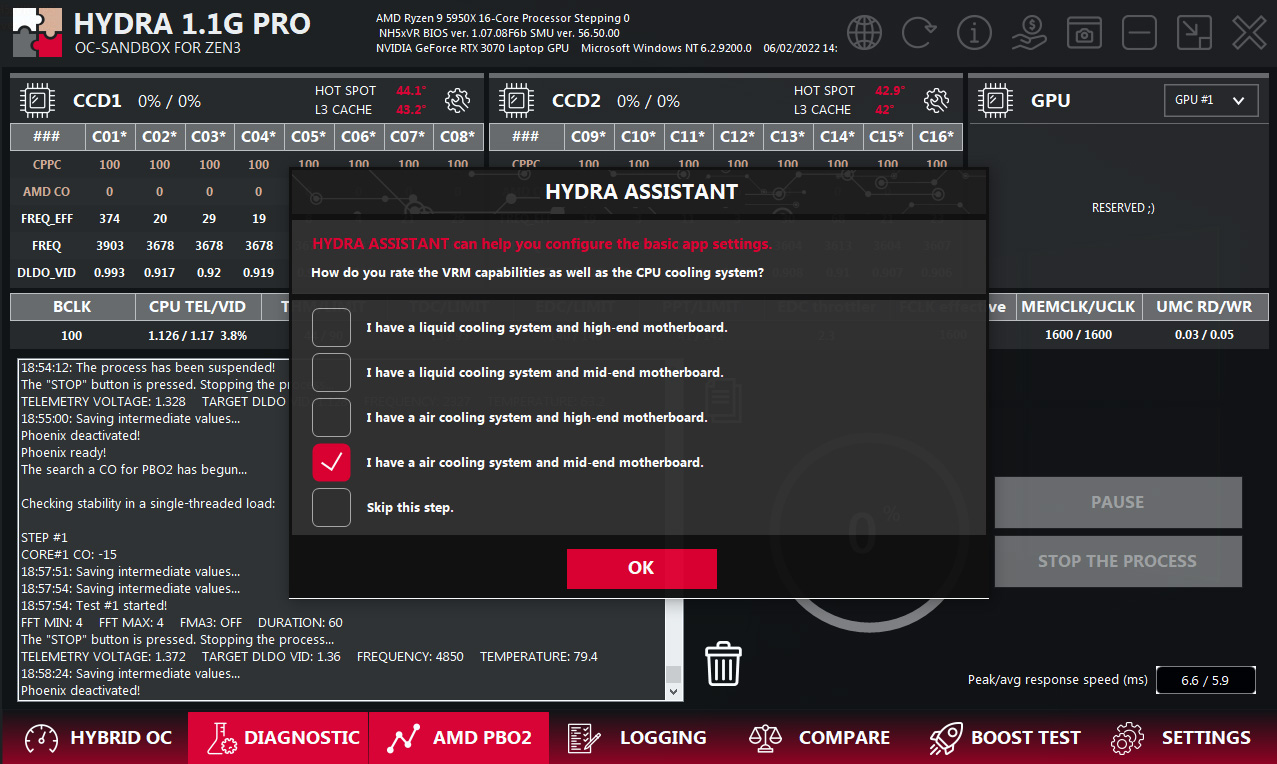
You can also check the “Assistant” mode (top right), which will prompt some questions before the diagnostics process starts. You can answer them like me, but to be honest, I am not sure yet what kind of an effect those answers have on the diagnostic results. I will let you know when I know more.
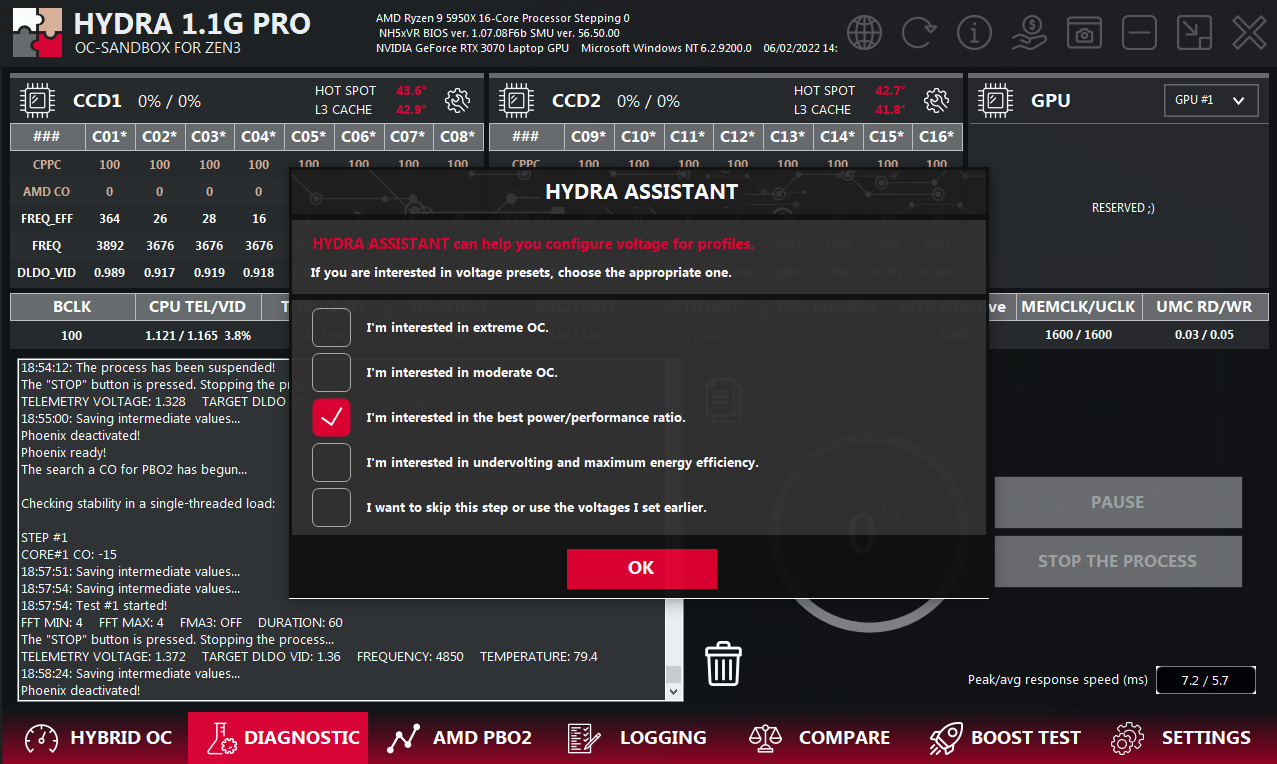

Most importingly, since our VRM does not have a lot of muscles, it got a quite high voltage droop compared to desktop computers. To compensate that a little we will not test with 1375mV for the single core test as Hydra suggests, but with 1425mV. Don’t worry, this big voltage will actually never be applied to the cores, just because the voltage drops that much if load is applied. We should come out at 1.33V to 1.35V under load in reality and those are safe values.
If you ask yourself if different test voltages make any difference in the results check out the “Error Margins” section (Link), where I compared the CO results of some voltages between 1225mV and 1450mV with each other.
Now after making these little changes we are ready to start the diagnostics. This will take a while depending on your CPU’s core count, test duration and CPU’s silicon quality. The higher one of these three factors is the longer it will take. But, as mentioned before, you should expect more than one hour per core, maybe even two hours on average. So yes, that means fully diagnosing the 5950X can take more than 24 hours using the “normal” 60s sub-test duration. Luckily Hydra allows to pause the diagnostic process if you want to do something else with the laptop in the meantime.
Also I will show you in another post how you can continue an older or aborted diagnostic run with some modifications. But Yurii announced version 1.1G2 will have a built-in option to continue diagnostics. So let’s see if it’s even necessary to “hack” the diagnostics in the future.
Log output
After the test has begun you will likely notice that Hydra is outputting text with some rather strange CO values. It starts at -55 or similar odd numbers, but isn’t AMD’s CO limited to -30 anyway? Well the confusing part is that Hydra got two different CO values. The ones presented in the text log are “Hydra CO” values and they are counter-intuitively not directly comparable to “AMD CO” values. But the AMD CO values are the ones we actually looking for when we want to directly set PBO2 AMD CO values in RyzenMaster or BIOS (there is a beta BIOS which gets tested internally and hopefully comes out soon). Don’t know why there is such a strange difference, but it might got something to do with the actual background communication taking place with the CPU and is more related to the coding/programming world than user world.
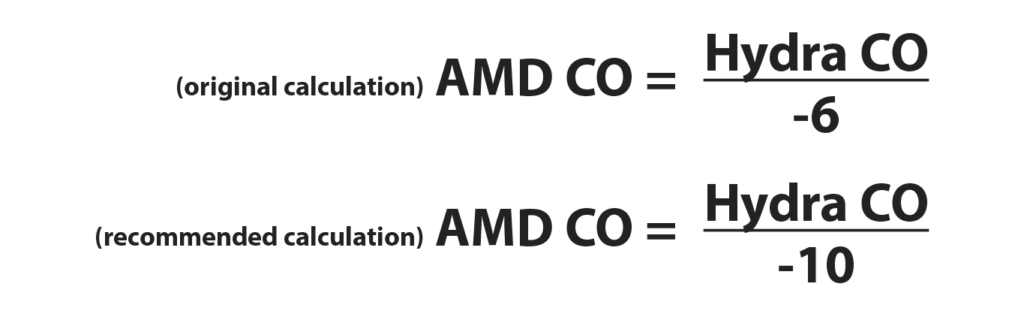
But don’t worry, of course there is a commonality between those two. You can translate one into the other by multiplying or dividing it by “-6” according to an older guide and according to the free version 1.0F. The freeware version described a divider of “-4” as “Fast CO”, divider of “-5” as “Mid CO” and divider of “-6” as “Safe CO”.
For example a Hydra CO value of 107 should correspond to an AMD CO value of 107/-6 = -17.8333 ≈ -17 (only integers allowed), which would be a really good result.
But be careful, those are far from “safe”and as I said earlier those are just at the edge of stability. I experienced some random crashes using the plain results together with the “-6” divider. So maybe you should back up a little. In my experience dividing your results by some lower dividers like “-8”, “-10” or “-12” instead of “-6” is a good idea. At least in my experience the “-10” divider should give you somewhat safe results which should not lead to crashes, in case you don’t want to spend multiple hours testing for stability for the best-possible CO values. In this example a divider of “-10” leads to an AMD CO value of 107/-10 = -10.7 ≈ -10, which is also easier to calculate with than with the “-6” divider, isn’t it? 😛
Of course you could also try your luck with other dividers like “-9” or “-11”.
In my experience the more “aggressive” CO values using the “-6” divider can work fine under load, but are not stable in idle or in low load situations (including single core bursts). This behaviour can be compensated by using the “Dynamic PBO2 CO” feature in the “AMD PBO2” tab. I entered my AMD CO results using the “-10” divider on the left side as usual, but activated “Dynamic PBO2” additionally. I left all of the “Dynamic PBO2 Settings” at their default values (Offset 10, CAC 8, CPU usage 70). This gave me a little boost in multi core loads while the system remains stable.
Notes:
You can also find the whole log output in a file located in Hydra’s install directory, in case you loose the log output during a crash or during the final performance test.
In case you experience crashes you could also try to decrease the PBO2 AMD CO values for each core by 1 using the “-” and “+” buttons at the top of the sliders.
Error Margins
Keep in mind that Hydra is not always consistent in finding stable settings since it can’t test a core forever and for all possible loads. If you repeat the test for one core multiple times you will see that Hydra in version 1.1G together with this laptop model got a statistical accuracy in the range of 4 to 5 AMD CO, or 24 to 30 Hydra CO. That results in two logical considerations:
- The results you got for some cores are optimistic and under some circumstances unstable. It may be necessary to substract the inaccuracy from your results to get a stable system.
- If you find one core more unstable than the others you should re-test this single core multiple times and stick with the worst result for it. I will show how you can speed up the Hydra OC diagnostics in a follow up post. Otherwise it’s hard to track down the unstable core. Usually only synthetic tests can show instabilities on a specific core.
The Hydra manual claims that it logs which cores were active during a crash when you use Hybrid OC. This might or might not be accurate, but can give you a hint in case it happens more often. Unfortunately I have never managed to see such a log output even after a crash, though. Hope version 1.1G2 will improve that.

In the following table you can see the resulting AMD CO values of the “AMD PBO2 CO” test for Core 1 of my 5950X. I’ve tested four different voltages and let Hydra look for an AMD CO value five runs in a row.
The results show that higher voltages should have a little less error margin and lower CO values than the lower voltages. Especially the 1300mV behave a little weird though. Its CO values are all over the place. Of course it could be related to the very limited amount runs, though. Five runs are not statistically significant enough, so take the results with a grain of salt.
Note: The default voltage Hydra uses is 1375mV.
1450mV | (default) 1375mV | 1300mV | 1225mV | |
|---|---|---|---|---|
| Run 1 | -22 | -23 | -20 | -24 |
| Run 2 | -22 | -23 | -21 | -25 |
| Run 3 | -23 | -19 | -25 | -25 |
| Run 4 | -22 | -24 | -21 | -24 |
| Run 5 | -23 | -22 | -23 | -24 |
| Error Margin | 1 | 5 | 5 | 1 |
| Mean Average | -22.4 | -22.2 | -22.0 | -24.4 |
| Median Average | -22 | -23 | -21 | -24 |
Diagnostics: AMD PBO2 CO
And finally I will also show you the first option “AMD PBO2 CO”, which is designed to find classic AMD CO settings only, without a fancy Hybrid OC profile.
Thanks to the new 1.1G2 version you can not just set starting CO values for every CCD but for every Core. This comes in useful when you already have a rough estimate which core is good or bad and you can drastically reduce the diagnostics time using this feature. Of course it’s useless in case you are doing it for the first time and you got no idea at all. Usually -10 AMD CO for the first and -15 AMD CO for the second CCD as set by default is a good enough starting point. In my experience the MC test will not pass anyway, due to the weaker VRM in this laptop compared to desktop computers and too high power settings by Hydra during diagnostics. I have deactivated it.
Just as with the full “Hybrid OC CO” diagnostics the “AMD PBO2 CO” one will take a long time, but can be noticable shorter, because Hydra allows you to start at some higher CO settings straight away. This way a full diagnosis with the 5950X can take less than 24 hours.
But, just as explained in the “Hybrid CO OC” section above, keep in mind that the values found are very likely not stable under normal circumstances. You should plan in a static offset of +5 or use just 60% of the values shown in the results (60% by -6/-10 = 0.6, it’s just the same as with the dividers explained before). Feel free to experiment with other percentages, of course.
Also mind possible inaccuracy as explained in the notes before.
Diagnostics: Profile Creation
Note that the “Profile Creation” feature does not work in the XMG APEX 15 MAX with Hydra 1.1G, because it uses too high CPU power settings by default. If it gets fixed you should use 88W PPT at max in the “Profile Creation” settings for this laptop. I used 96W PPT (10% above stock) during my inestigations only.
You can let Hydra create a Hybrid OC profile for you. Simply enter the target PPT and temperature (THM).
To create a Profile automatically you need a finished “Hybrid OC CO” diagnostic run, or entered some CO values into the LT table in the tab “Hybrid OC”. Then you can uncheck both tests and leave just “Profile Creation” checked. This way Hydra will create a new Hybrid OC profile for you according to your newly set target PPT and temperature.
Hydra will check your processor’s clock behaviour suring it is running some benchmarks.
Hybrid OC
Discalimer: This feature probably does not work very well with the XMG APEX 15 MAX together with the Hydra Pro version 1.1G and Hydra freeware 1.0F.
The very first tab called “Hybrid OC” is a neat way to combine the best of all worlds: highly optimized Curve Optimizer settings in mixed loads and “Manual OC” (fixed core clockspeed & voltage) for highly multi-threaded loads. This way we can improve our render and simulation performance even further. Well, at least in theory.
I couldn’t manage to make this run stable enough in all applications with reasonable settings. Hydra is operating at software-level and is not tied as close to hardware level as factory-OC features like AMD’s PBO2. It looks like the time Hydra requires to register different loads seem to be too high, thus leading to too high power draws when it switches from 1T load (1 core) to All-Core AVX for example. Most times it works, but in some attempts it does not switch to the AVX settings fast enough and applies the 1T settings (high clockspeeds, high voltage) to all cores for a blink of an eye. Especially the AIDA64 Memory Test gave me a bunch of crashes.
There might be a chance that this behaviour gets improved soon and will work fine with small ECO-Mode VRM designs like we got in our laptop. So let’s assume that it will work fine one day and take a look at the Hybrid OC feature …
As I said Hybrid OC is a neat feature which allows to combine load-dependend Manual OC (fixed core clocks & voltages) together with Hydra CO. While CO tuning alone (AMD PBO2 CO) allows to reach 8,000 points in Cinebench R20 (20,000 in CineBench R23) with fans at max only, Manual OC can give you another 10% to 15% and allows to reach 8,800 points in Cinebench R20 sustained with an average binned 5950X CPU and 88W PPT. It surely is not a necessary feature for all of you, but under some circumstances like “more computation power means less computation time” and “time is money” it can be a blessing.
I have described an –in my experience– good way to find stable “Manual OC” settings in another post of mine using CineBench R20 and Ryzen Master. The guide is written for the B450 chipset based laptop for Zen2 CPUs, but it will work with the B550 laptop and Zen3 CPUs, too. The only thing that does not work is the ZenStates software because it was made for Zen2 processors only, unfortunately. As far as I know there is no software which allows to apply plain simple ManualOC settings after boot automatically. Unfortunately Ryzen Master does not support a similar feature and you need to apply your settings after every boot by hand. But here comes Hydra’s Hybrid OC into play and should allow similar results, too.
You can either use Hybrid OC only, or in combination with AMD PBO2 CO. But it is known to not work well with the “Dynamic PBO2” feature (CO Offset for multi-core loads), so keep it turned off.
There are a lot of settings and a lot of them can lead to instabilities. Normally it’s recommended to use the “Profile creation” feature of Hydra’s diagnostic tab for this, but unfortunately it uses too high CPU power settings automatically which leads to crashes while the profile creation is running. It might get fixed in a future version, though.
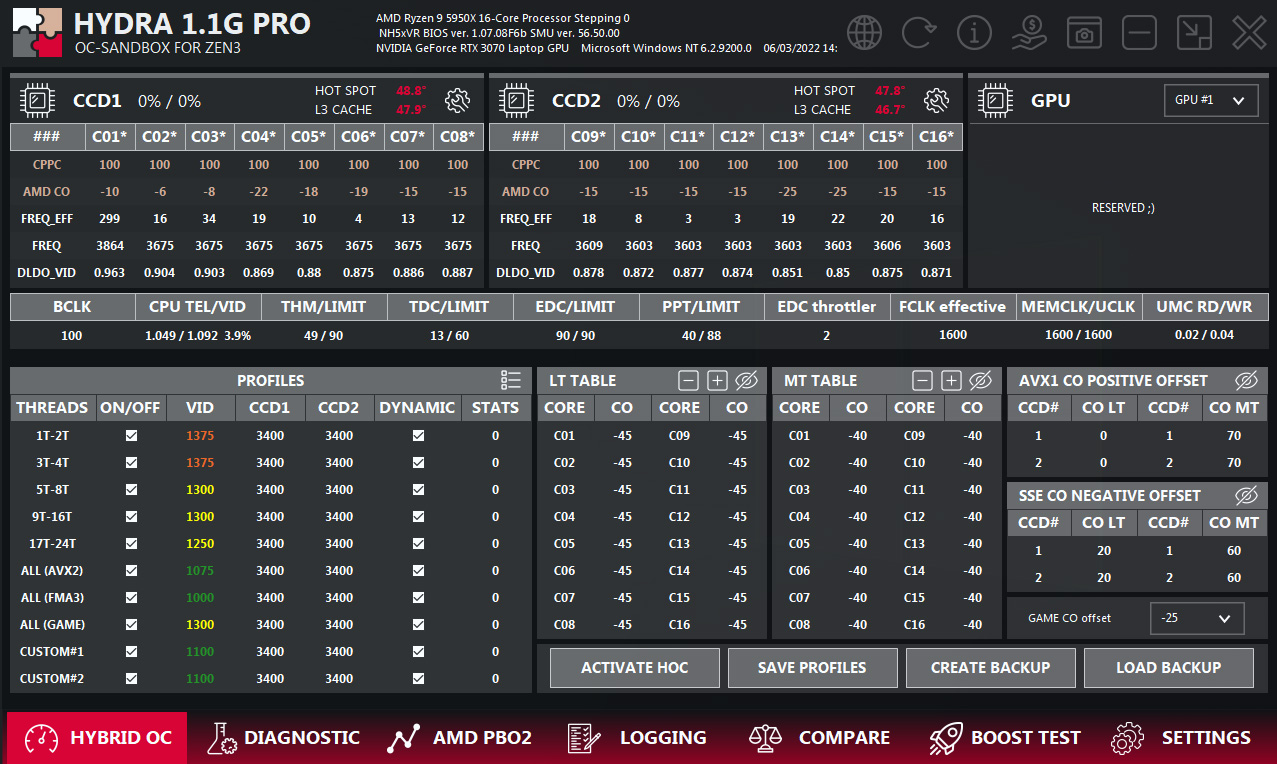
But even if you don’t want to use the “Manual OC table” (left side) there still is another neat feature in the Hybrid OC tab, which looks like it makes use of ManualOC in combination with the Curve Optimizer feature. There are four different tables (use eye icon to make them show up) on the right side in which you can enter various CO values and CO offsets for different situations by hand or automatically using the “Profile Creation” option in the diagnostic tab.
Note: The current version 1.1G uses the processor’s default PPT of 142W, 95A TDC and 140A EDC the “Profile Creation” fails. We would need to make the diagnostics run in ECO-Mode (88W PPT, 60A TDC, 90A EDC) to make it work. I hope that’s just a bug and gets fixed with version 1.1G2. Otherwise I will post a feature request for future versions.
To make use of the CO values for the different profiles you entered on the left side (“Profiles” table), you have to activate the “dynamic” checkbox in the left table.
After you are done you can activate Hybrid OC by clicking on the “Activate HOC” button.
Down below are the default and my settings for the 5950X Hybrid OC was working okay with. As I said it wasn’t all-time stable, so I left Hybrid OC disabled after all.
—
Hint: Do not use the default settings given by Hydra in this tab! Especially not the different Manual OC “Profiles” on the left. They will VERY likely crash your system under load straight away in case you got an 5950X like me. Even the 5900X could crash with them. Those presets are made for desktop systems with the full power range, but we are limited to ECO-Mode-like power settings.
Better suited for the 5950X and full load scenarios (marked with “all” in the table) is 925mV to 975mV. When there are less threads used (f.e. 5T-8T) you can use higher voltages like 1200mV of course.
Hydra Freeware (version 1.0F)
The freeware of Hydra is based on an older pro version and thus comes with a little bit different layout than the more up-to-date pro version.
All of the features are comparable, some at other places (most missing ones are somewhere in the settings tab) and some are even missing, like the AMD PBO2 tab.
Because the AMD PBO2 tab is missing the Diagnostic tab is stripped down to Hybrid OC diagnostics only, which take noticable longer. But that’s pretty much the only option you got.
When you got your diagnostics results you can apply the same rules as explained in the “Diagnostics: Hybrid OC CO” section for the pro version earlier. But you may find the Hydra CO values to have even bigger error margins than with the pro version. That’s because the newer pro version got some improvments regarding the overall accuracy of the diagnostics. After all my tests I would suggest you go with a “-12.5” divider and an error margin of 4, 5 or 6. Simply because I didn’t perform the error margin test with the freeware version. You are welcome to do it yourself and report back your results.
—
In the following table you can find the results I got with the older freeware and the newer pro version. As you can see the results differ quite a lot and the freeware version tends to put out more optimistic numbers. In fact the Hydra CO values we got by using the older freeware are all higher than the results we got with the newer pro version. Half of the results are roughly 90% off, while the others are roughly in the range of 80% and 60%. The average percentual difference is 81.6%. So MAYBE it might be a good idea to multiply your Hydra CO results in the freeware version by 0.8 or 0.816 before you apply the calculation formula with the divider of “-10” presented before. But keep in mind that error margin may be a completely other story as I already said.
If the error margin is bigger than with the newer version it would be a good idea to repeat the whole Diagnostic test at least a second time and to stick with the worst result for a core. I will show how you can speed up the Hydra OC diagnostics in a follow up post.

| Core # | Freeware 1.0F | Pro 1.1G | Percentual difference |
|---|---|---|---|
| 1 | 177 | 107 | 60.5 % |
| 2 | 113 | 68 | 60.2 % |
| 3 | 88 | 79 | 89.8 % |
| 4 | 249 | 223 | 89.6 % |
| 5 | 240 | 174 | 72.5 % |
| 6 | 216 | 197 | 91.1 % |
| 7 | 264 | 242 | 91.7 % |
| 8 | 224 | 205 | 91.5 % |
| 9 | 243 | 193 | 79.4 % |
| 10 | 197 | 187 | 94.9 % |
| 11 | 298 | 282 | 94.6 % |
| 12 | 196 | 181 | 92.3 % |
| 13 | 308 | 252 | 81.8 % |
| 14 | 298 | 246 | 82.6 % |
| 15 | 211 | 155 | 73.5 % |
| 16 | 258 | 155 | 60.1 % |
Quieter Fans with the Efficiency Mode
Still want to enjoy quieter fans but Hybrid OC can’t be made stable? There is still some hope. There is a feature which got nothing to do with Hydra, but I found still very useful, so I don’t want you to miss it. Its called the “Efficiency Mode” (previously known as “AMD Cool’n’Quiet”) in the XMG BIOS version 1.07.08F4 and higher. Using this mode the CPU will boost less aggressive and runs with 100mV less in idle. You could loose some tiny bit of performance in burst load scenarios, because your CPU will boost a little later and less reactive, though. But usually the losses are less than 2% of the overall performance and are likely not noticable.
The benefits are lower idle/desktop/browser temperatures, a little lower fan noise and lower power draw. Especially when there are short bursts of load like when webbrowsing the “Efficiency Mode” prevents nervous temperature spikes and keep the fans at a lower noise level this way.
And don’t worry about the gaming performance in the “Efficiency Mode”, you won’t loose any performance as long as there is more than one thread loaded, which is the case for (almost) all games. The only exception should be some old titles and not well optimized indie games. The biggest loss was seen with the 1T (one thread only) test in the CPU Profile benchmark by 3DMark. All other results should be within margin of error. Additionally the performance with AMD’s PBO2 is tightly bound to CPU temperature, where small temperature deltas can mean noticable performance differences.
To enable the Efficiency Mode go into your XMG BIOS (hit F2 when logo shows up), next Setup, then Advanced, AMD CBS, SMU Common Options and locate the “EfficiencyModeEn” option at the very top. Set it to “Enable”, hit F10, save the changes and let it reboot. Done.
| Efficiency Mode Off | Efficiency Mode On | |
|---|---|---|
| Core VID | 1.424 V | 1.007 V |
| Core Clocks | 4459.8 MHz | 3593.3 MHz |
| Tctl/Tdie (temperature) | 58.8 °C / 137.8°F | 56.3 °C / 133.3 °F |
| CPU Package Power Draw | 35.34 W | 33.30 W |
| Efficiency Mode Off | Efficiency Mode On | |
|---|---|---|
| SOTTR Benchmark (High Preset, TAA) | 23551 Frames (150 FPS) | 23756 Frames (151 FPS) |
| Cyberpunk 2077 Benchmark (High Preset) | 5963 Frames (92.84 FPS) | 5896 Frames (91.77 FPS) |
| 3DMark CPU Profile 16T | 8665 | 8720 |
| 3DMark CPU Profile 8T | 5475 | 5263 |
| 3DMark CPU Profile 4T | 3255 | 3169 |
| 3DMark CPU Profile 2T | 1761 | 1707 |
| 3DMark CPU Profile 1T | 914 | 729 |
My Results
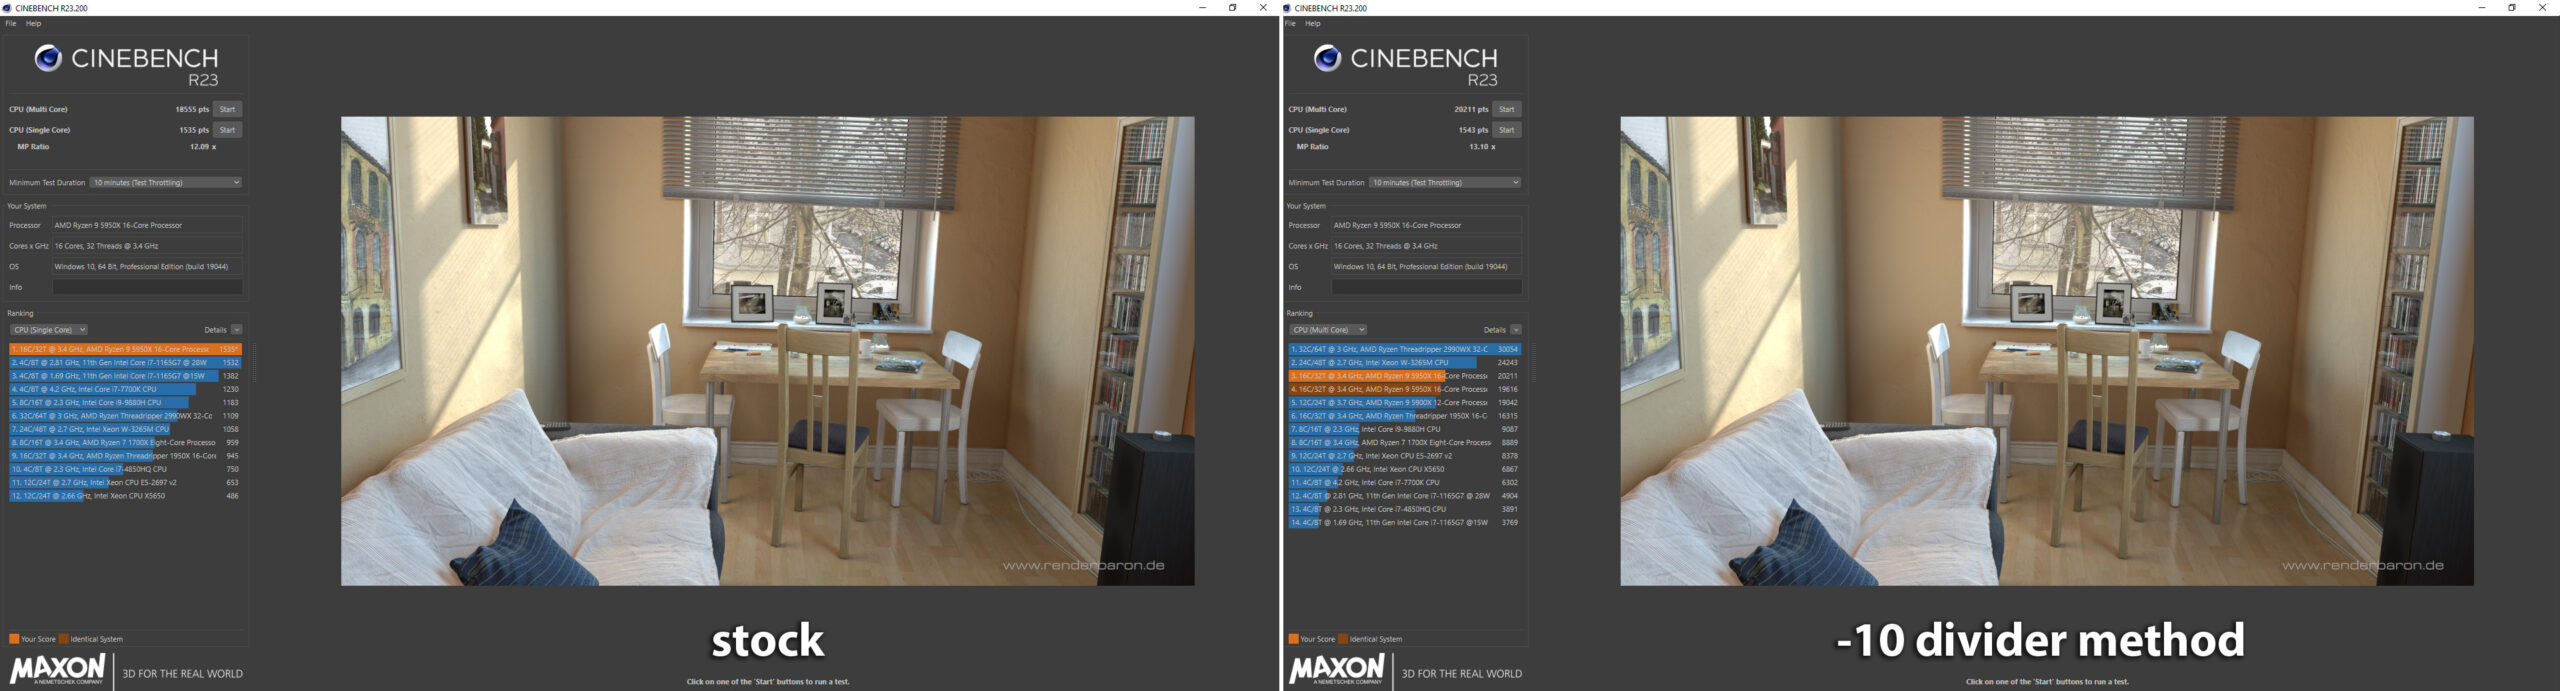
Project Hydra surely is a nice tool to play around with. But what are the actual results in numbers? Well let’s compare the stock and Curve-Optimizer-tuned peformance of my 5950X. The results were acquired with the described “-10” divider and an error margin of 3.
Both Cinebench benchmarks were performed with fans at max in combination with a 3-minute cooldown before the benchmark was actually started. This way I could make sure the tests were as fair as possible. Please note that PBO2 is very sensitive to the actual core temperatures, so a run with fans at their maximum speed will always spit out a better result than the fan speeds used by the power modes (e.g. Performance Mode). My stock 5950X sample CPU does reach roughly 6800 points in CB20 when the laptop is warmed up and 7200 points when the laptop got a chance to cool down in beforehand. This behaviour makes it hard to get comparable results, so take them with a grain of salt.
The other benchmark do not vastly benefit from the AMD Curve Optimizer feature, but especially the games were limited by the GPU, not CPU anway.
All test were performed with the laptop’s back slightly lifted (roughly 25mm or 1 inch).
Cinebench R20 and R23
The Cinebench tests were performed with fans at max (Fn+1 keyboard shortcut) to make all test conditions fair and more comparable.
All in all I achieved an 8% to 9% uplift in performance.

3DMark CPU Profile Benchmark
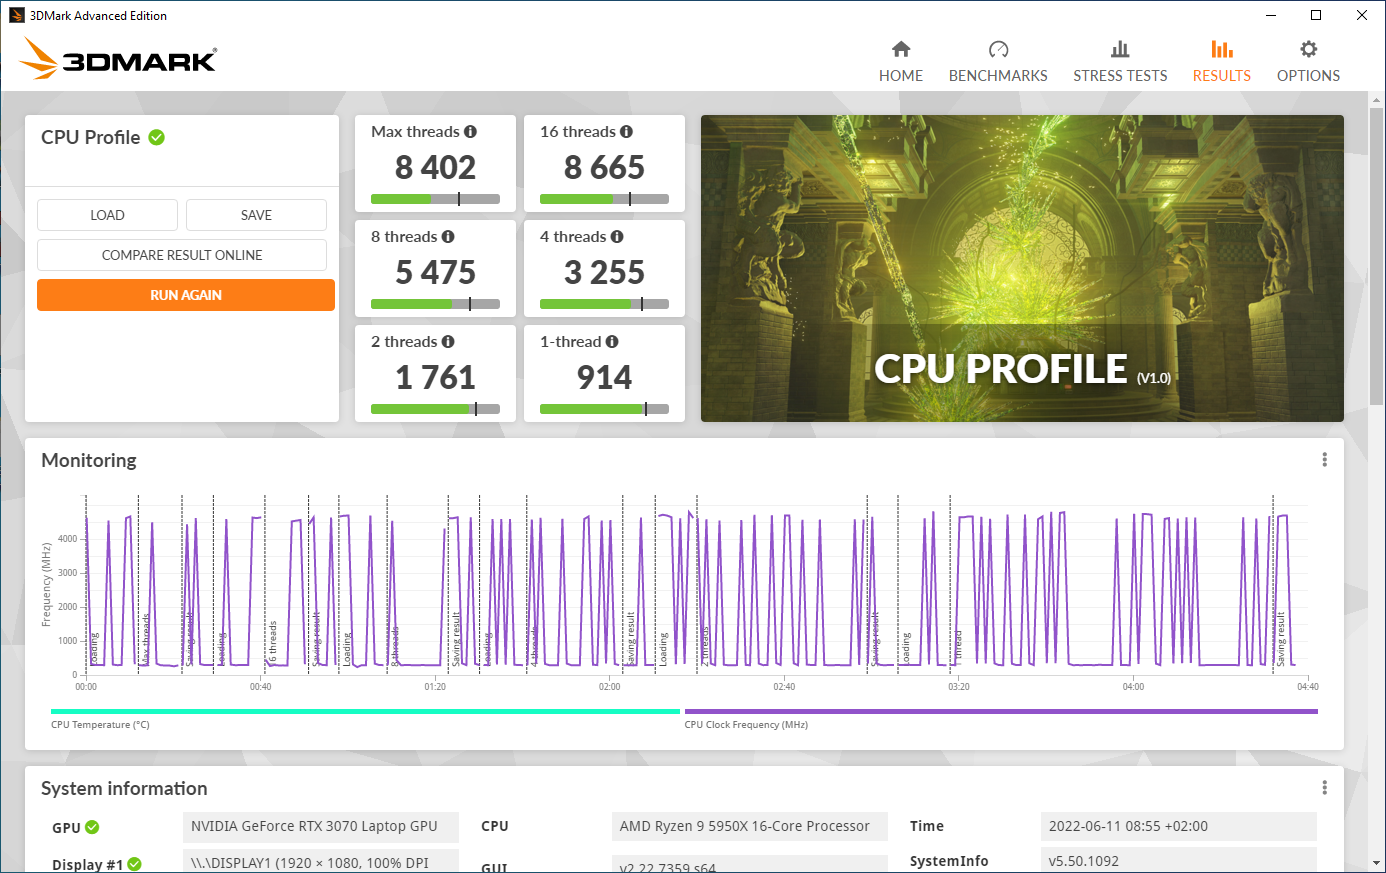
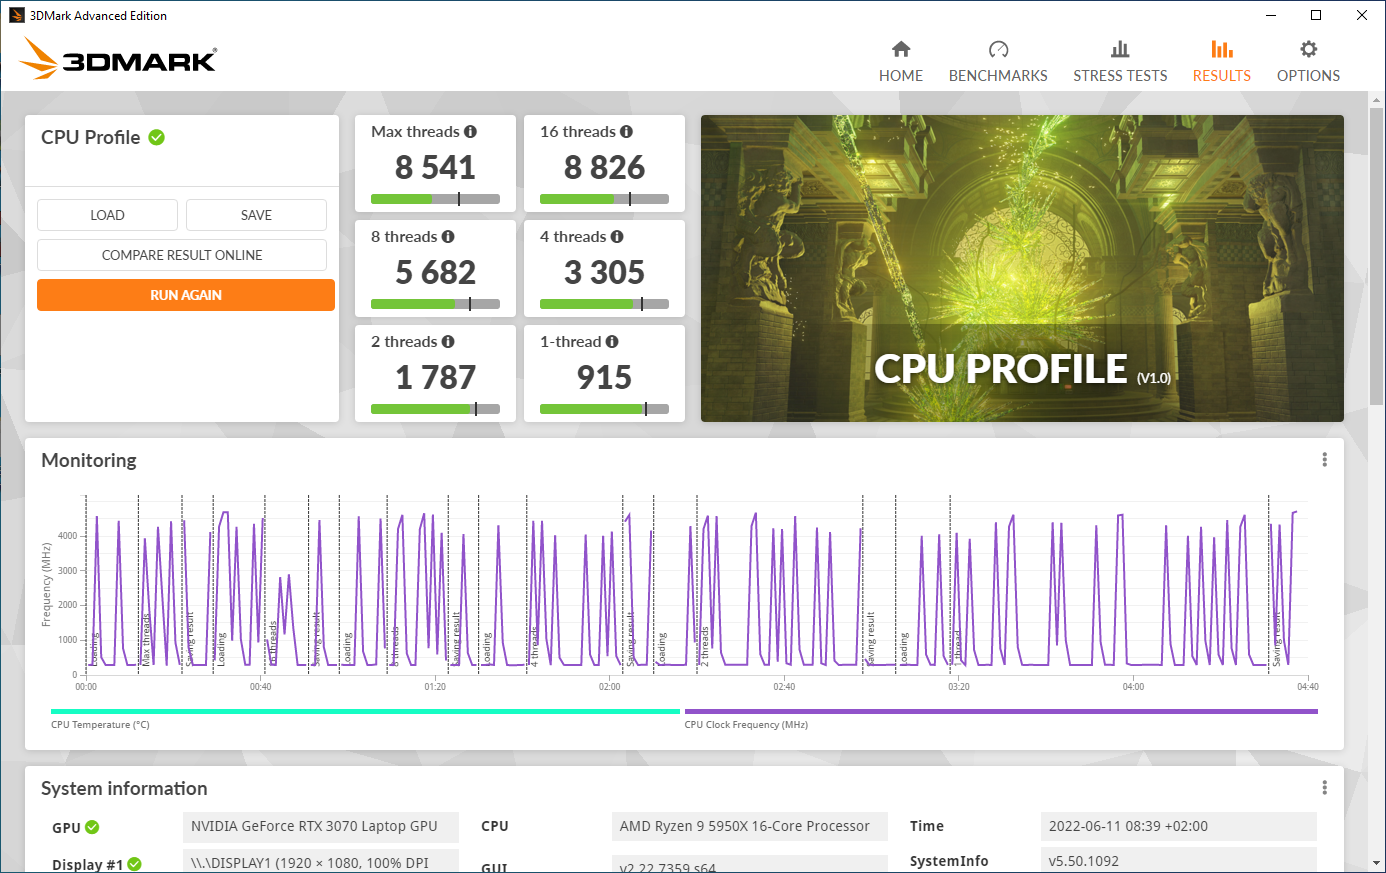
Stock (left) | With Curve Optimizer (Right) (roughly +1.0%)
Game Benchmarks
Both games were limited by the GPU, so the benefits by the Curve Optimizer are not noticable in those two games.
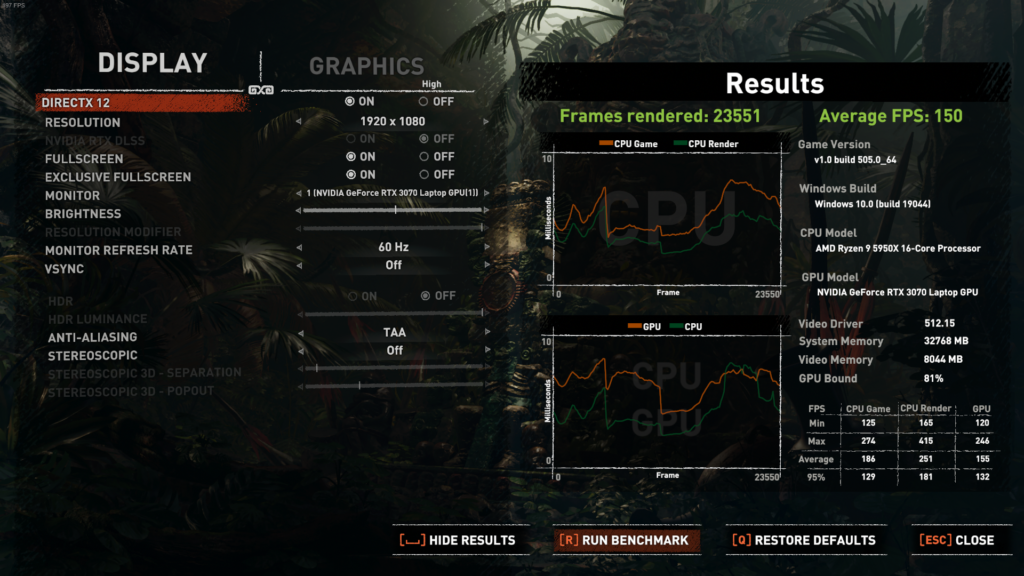
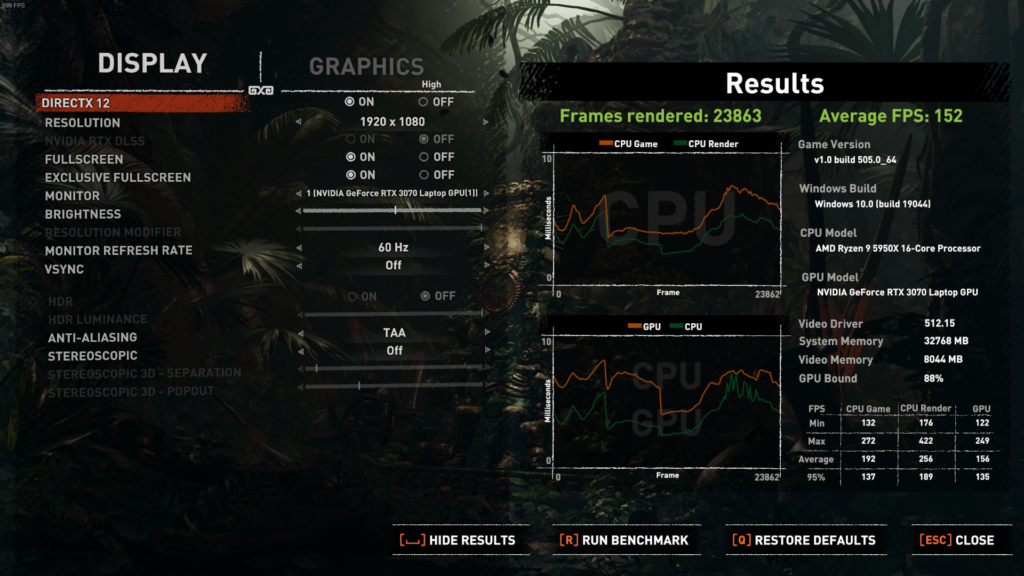
Stock (left) | With Curve Optimizer (Right) (+1.0%)

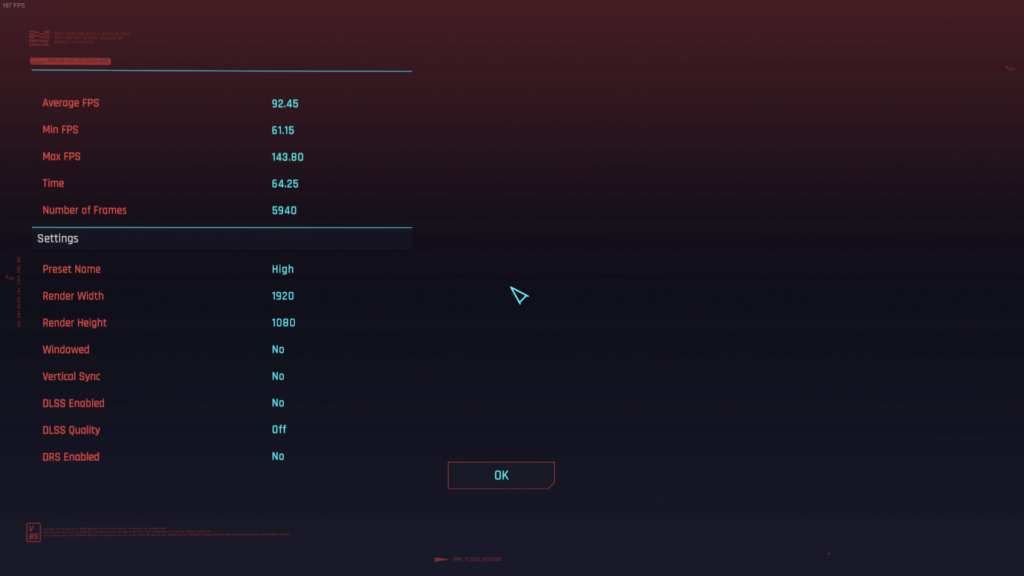
Stock (left) | With Curve Optimizer (Right) (+0.0%)
Conclusion
- Activate EfficiencyMode in BIOS for quieter operation in idle or when browsing the web, otherwise fans will spin up with an high-tier CPU like the 5950X more often.
- Better stick with “AMD PBO2 CO” only
- Hybrid OC not stable
In conclusion I can really recommend to use AMD’s PBO2 Curve Optimizer, because it unlocks performance for free, lowers the overall power draw and temperatures a little bit. If you want to have a noticable quieter operation in idle and low load situations you should enable the “Efficiency Mode” in BIOS.
But beware, I found that Hydra cancels the effects of the “Efficiency Mode” when it is or was running. Hydra seems to make runtime changes to the processor’s power states on hardware level and can only be reverted with a reboot. So when you want to make use of it you should enter the AMD CO values in Ryzen Master. Hydra should only be used as a diagnostic tool to get the AMD CO values in this case!
To get stable AMD CO values you can make use of Hydra’s Diagnostic tool. In my experience the “Find AMD PBO2 CO” option is good enough, but can top out at the limit of -30. In this case the “Find Hybrid OC CO” option is more suitable, even if it takes noticable longer. There is a trick how to shorten the length of the Hybrid OC diagnostics, though. But I will discuss that in another post.
Unfortunately testing for stability can be very annoying and can take multiple days. If you want to get some stable settings faster you can use some of my tips and use some higher dividers like “-12” and/or a higher error margin of 5 or 6 as described earlier. You may not get 100% out of your processor doing so, but you are back to being productive with your laptop a lot faster.
FAQ
Hydra does not continue Diagnostics after a crash
It happened to me quite often actually. So Hydra goes on diagnosing a core, crashes at a too high CO value and the laptop reboots. You are back in Windows, Hydra will continue automatically roughly 60 seconds after login. But sometimes, it just shows the start screen of Hydra (warning text) and does not return to the diagnostic mode.
In this case: don’t panic. Simply close Hydra (x-button at the top right) and start it again manually. Now it should continue with the diagnostics.
Diagnostics abort with a “limit exceeded”-error
I have reported about this problem using some version of Hydra here (Link). You can fix it by setting your PPT to 135W and your EDC to 140A in Hydra’s safety settings. It’s not advisable to keep it like this after diagnostics.
Crashes in idle and applications
If you experience some crashes in idle or during application start-ups you can try the following things:
- Reduce your PBO2 AMD CO values by 1 or 2 each core.
- Test the problematic cores again to find their worst result and apply the mentioned rules on them (“-10” divider for Hydra CO values or “0.6” multiplier for AMD CO values). According to the Hydra PDF there should be some info about which core was active in the log files. This feature might be limited to the pro version though. To be honest, I never saw such a helpful output.
- Crashes using Hybrid OC are likely in my experience, even if you use stable settings. I think the more inaccurate switching between profiles on the software level simply overdrives the rather small VRM design in this laptop when compared to desktops.
